Night-mode field setup
Part 2 of 4 · Learning path · Sample counts
Start: the saved NY-013 from Part 1. Finish: understand the form and drawing setup, then discard both practice drafts; 37 sites / 49 features remain unchanged.
Build on the global field walkthrough with the Mapplex demo workspace. This part shows how the project is configured, then uses night mode and satellite imagery to practise drawing and Quick Capture.
The project uses fictional inspection sites, routes and service zones in New York, London and Tokyo. These are actual application screenshots in the phone interface and tablet mode. The drawing and NY-014 examples below are practice drafts; both were discarded after review.
Reading the screenshots
Original capture screens and downloads show this part's stage. Refreshed views may show the completed demo: 39 sites / 51 features. See why the counts differ. Select any image to view it at full size.
The prepared demo already contains these styles, fields, rules and reference mappings. Review them in place. Make configuration changes in your own training copy when practising setup; changing the form saves configuration, even though the capture drafts below are discarded.
1. Choose the view for the task
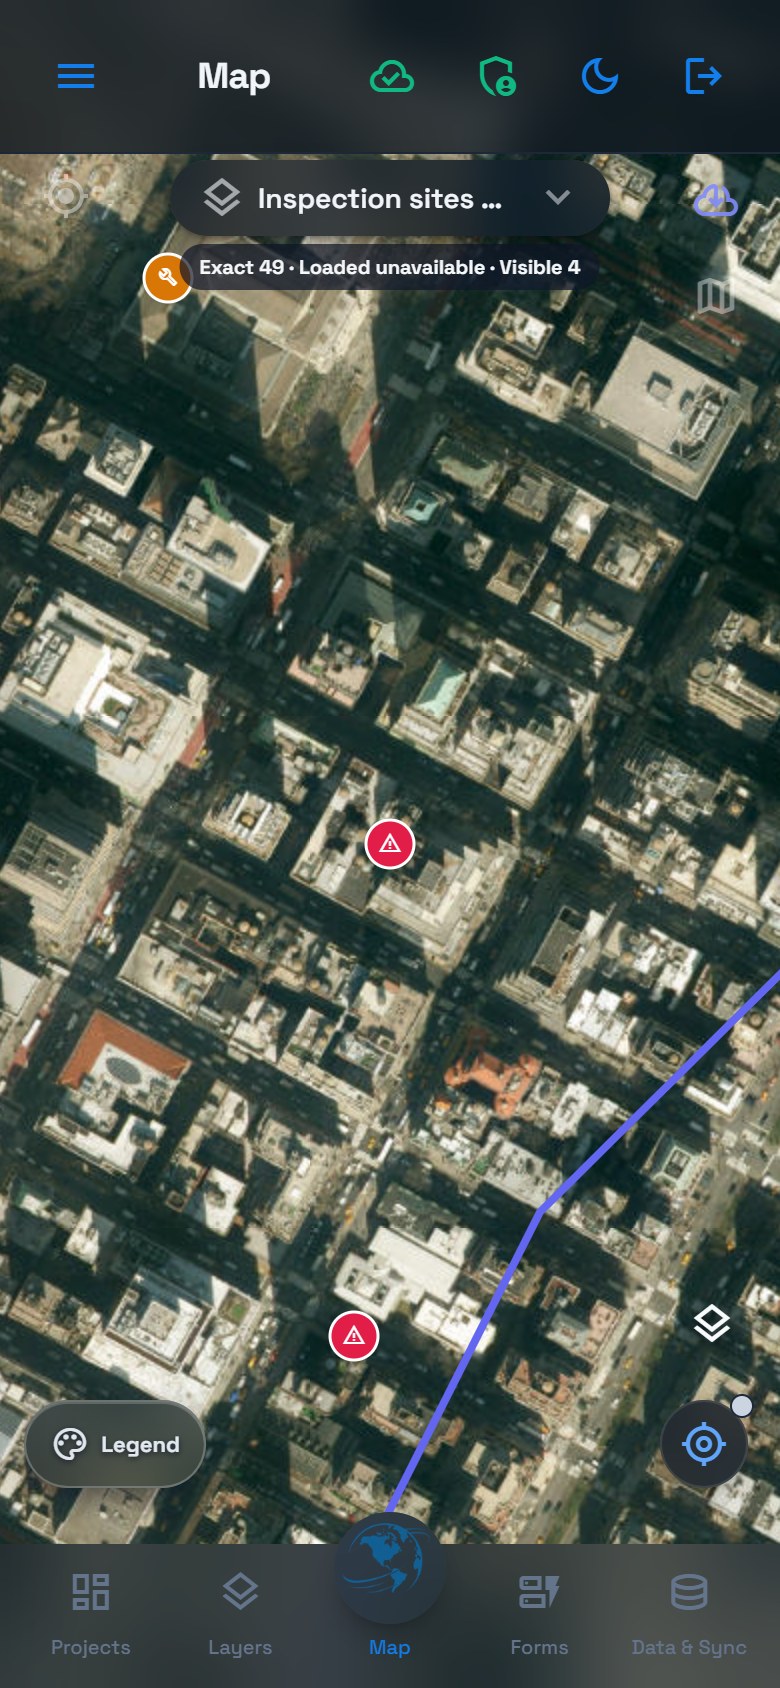
Use Toggle dark mode in the top bar to change the application's theme. On Map, use the basemap switch to choose Satellite. These are separate settings: the app can use a dark interface while displaying aerial imagery.
See the tablet mode view
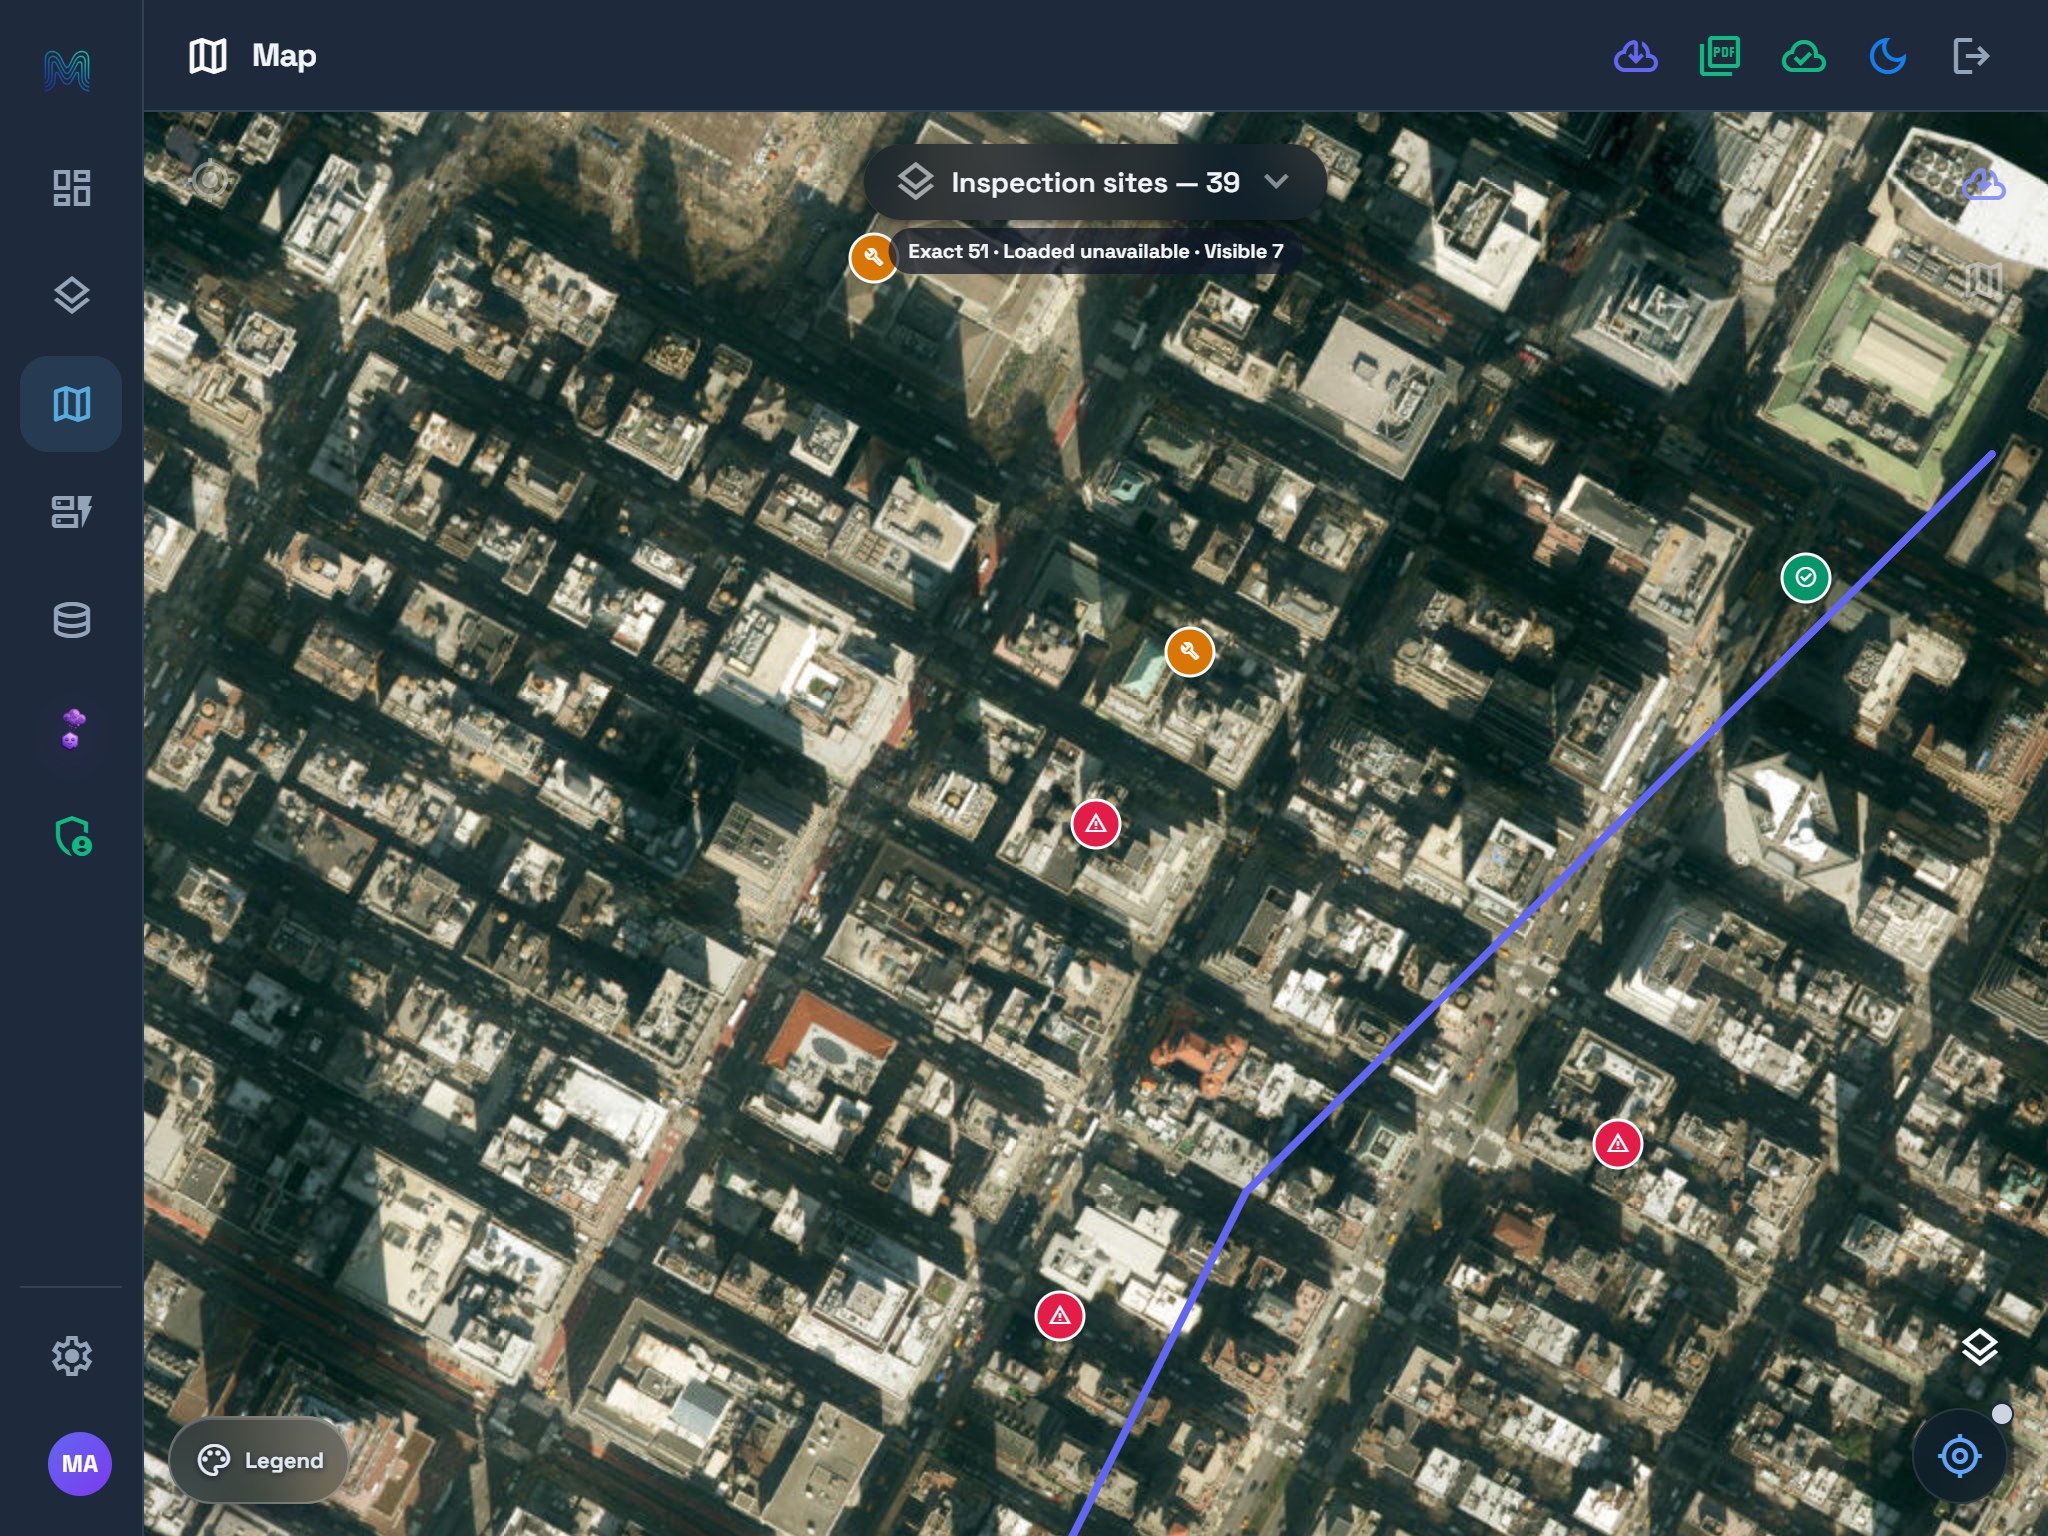
Use the street basemap when place names and city orientation matter more. Night mode changes appearance; it does not improve GPS accuracy or establish the date or survey accuracy of the imagery. The current map status may show Loaded unavailable; use the saved records and sync tools to check delivery.
2. Give each layer a clear role and style
Open Layers. Check the layer's geometry type before collecting: Inspection sites contains Points, Maintenance routes contains LineStrings, and Service zones contains Polygons. The visibility button changes what is shown on the map; it does not remove the layer or its data.
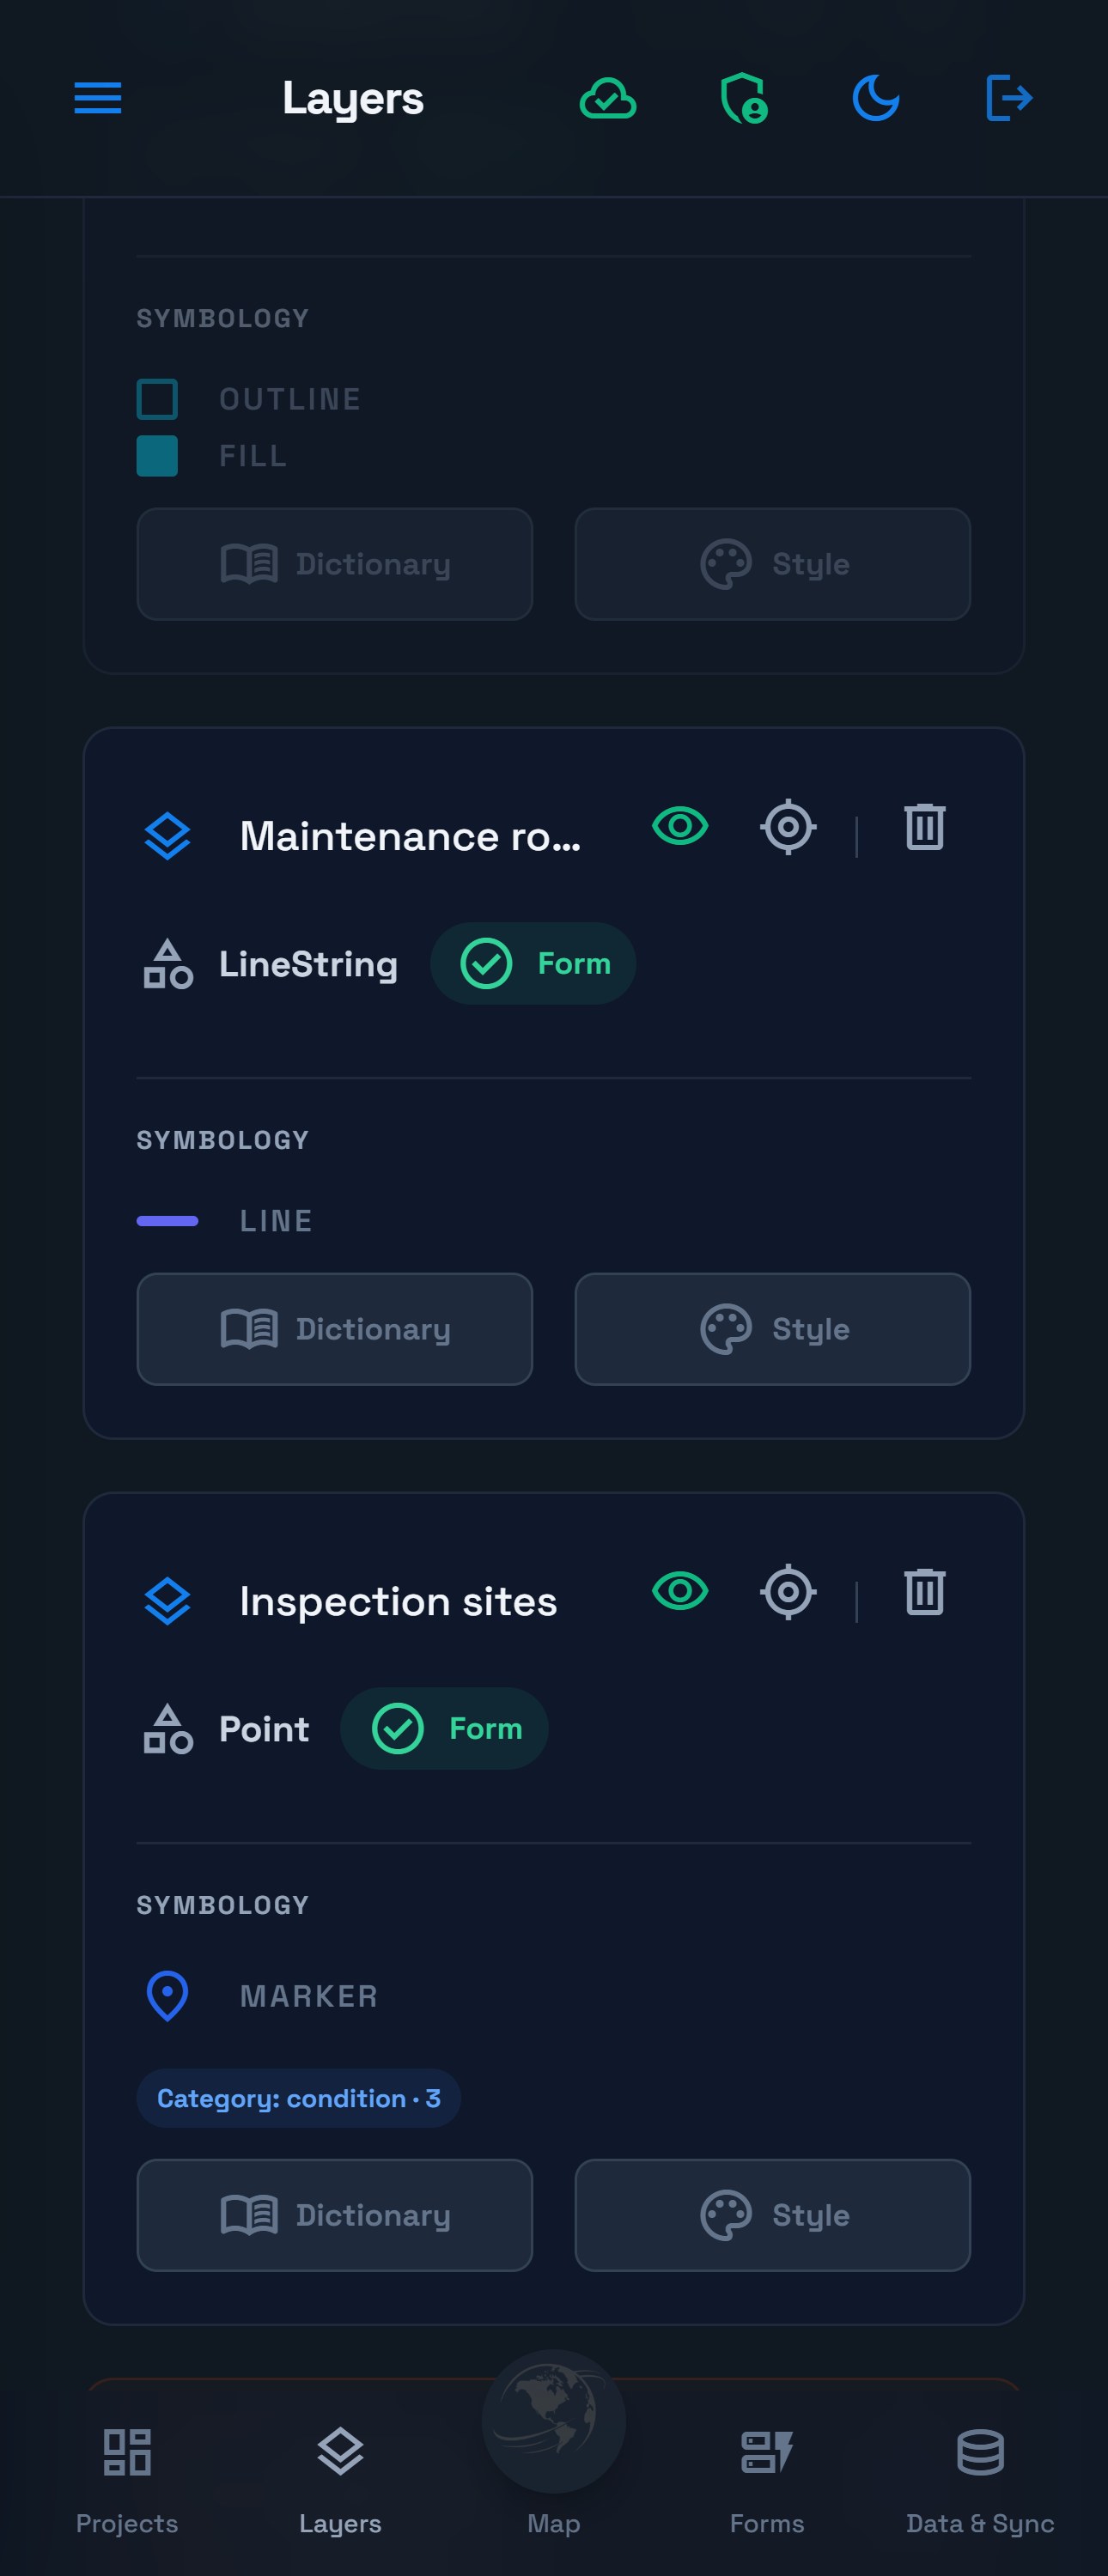
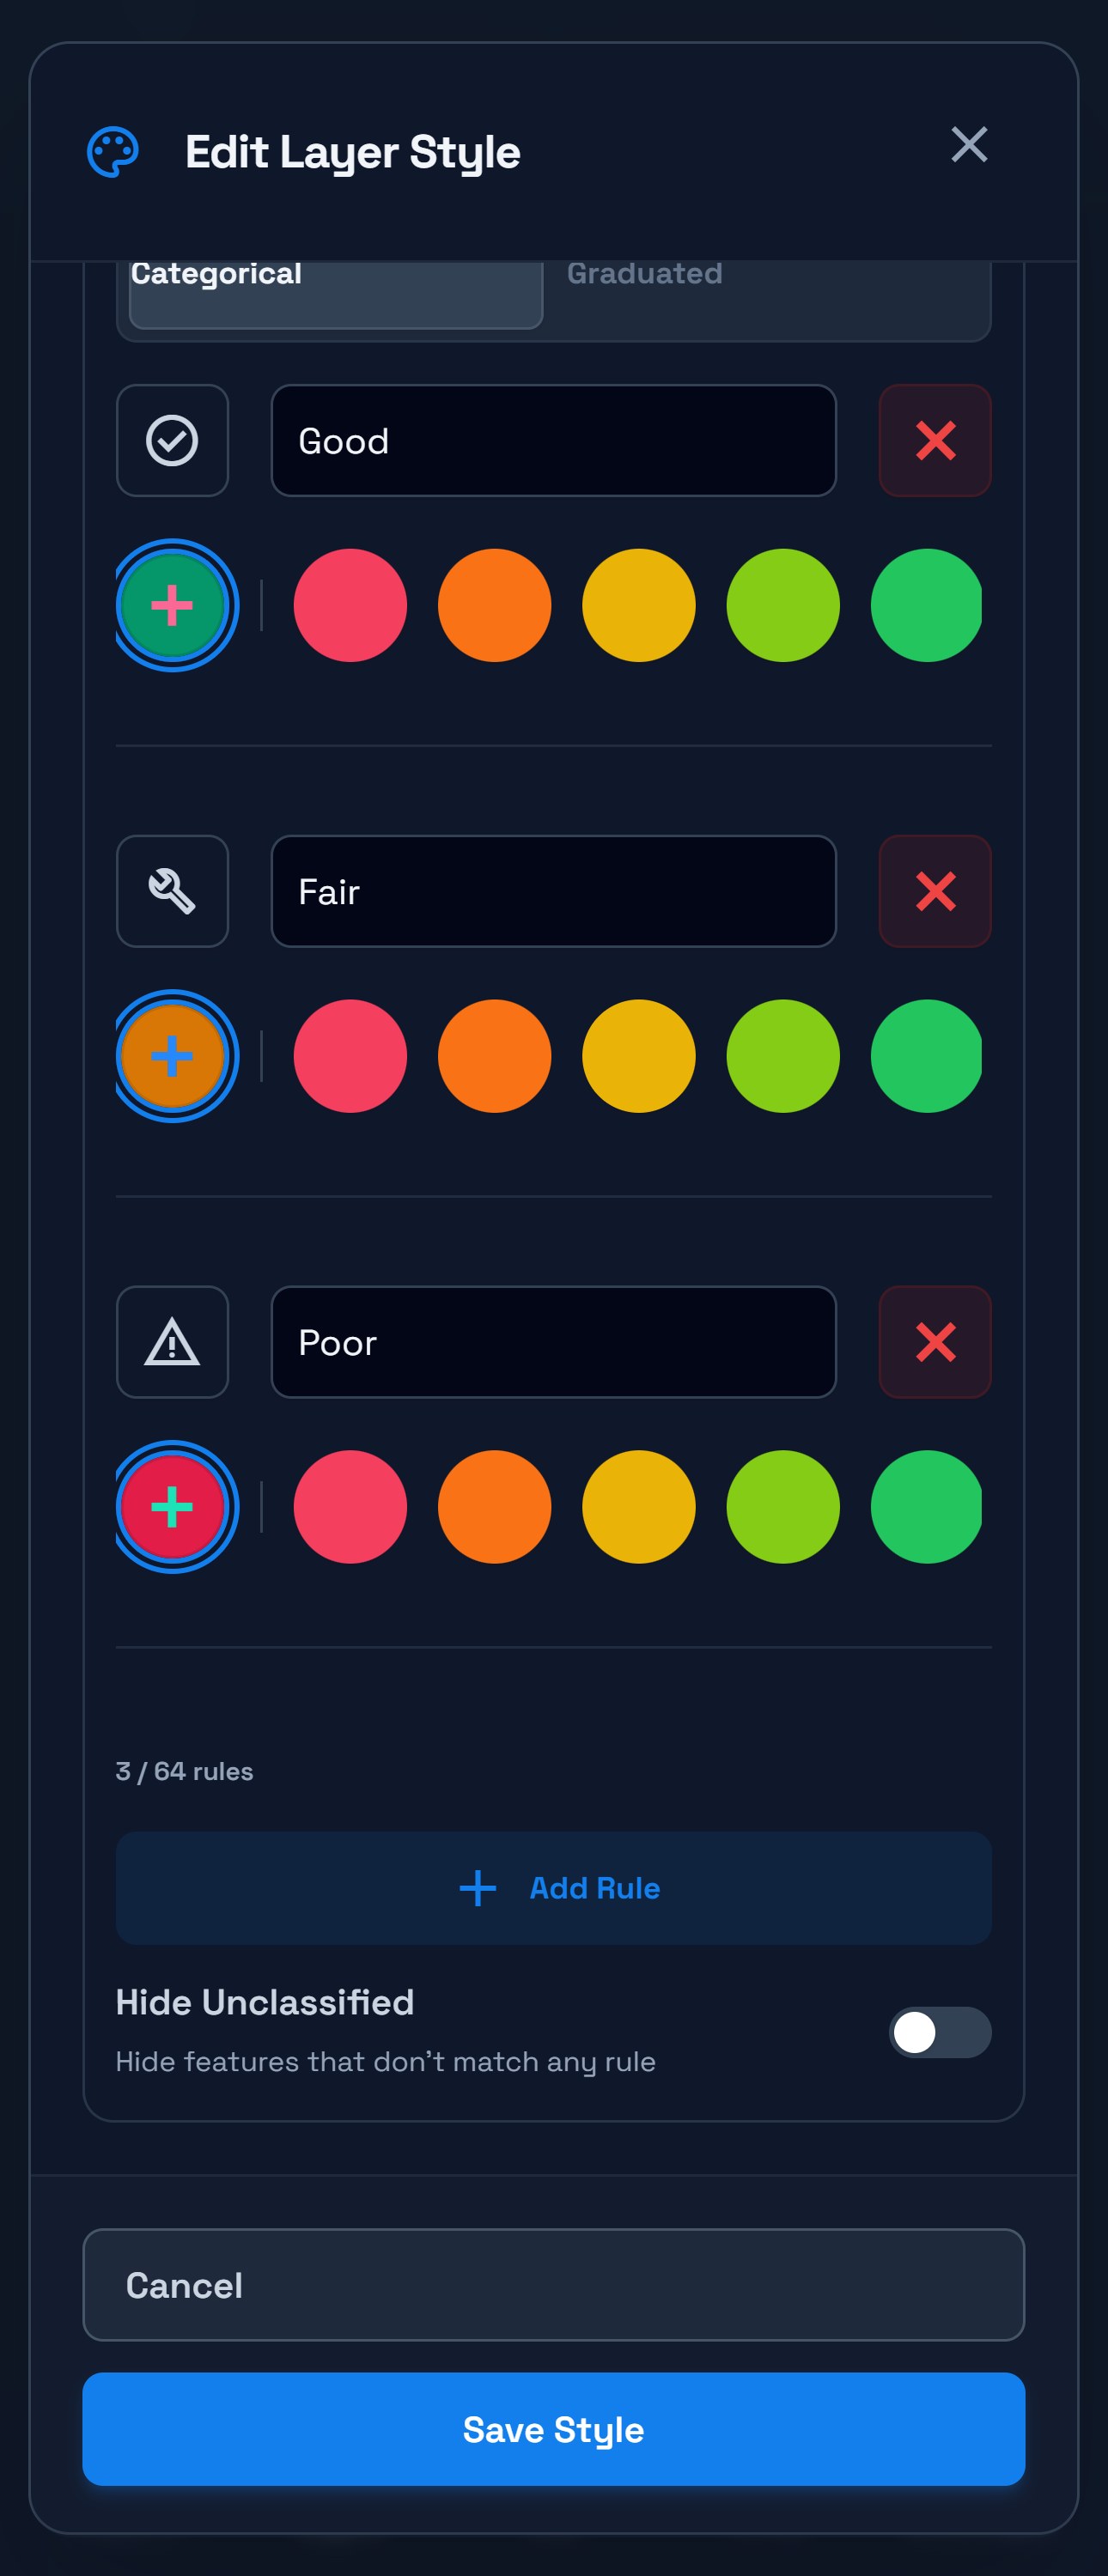
On Inspection sites, open Style. Choose Condition under Color by Field, then Categorical. The prepared project uses green with a check icon for Good, amber with a tool icon for Fair, and red with a warning icon for Poor. Keep Completion Indicator off when reviewing these condition categories; completion styling can take priority over classification.
See the tablet mode view
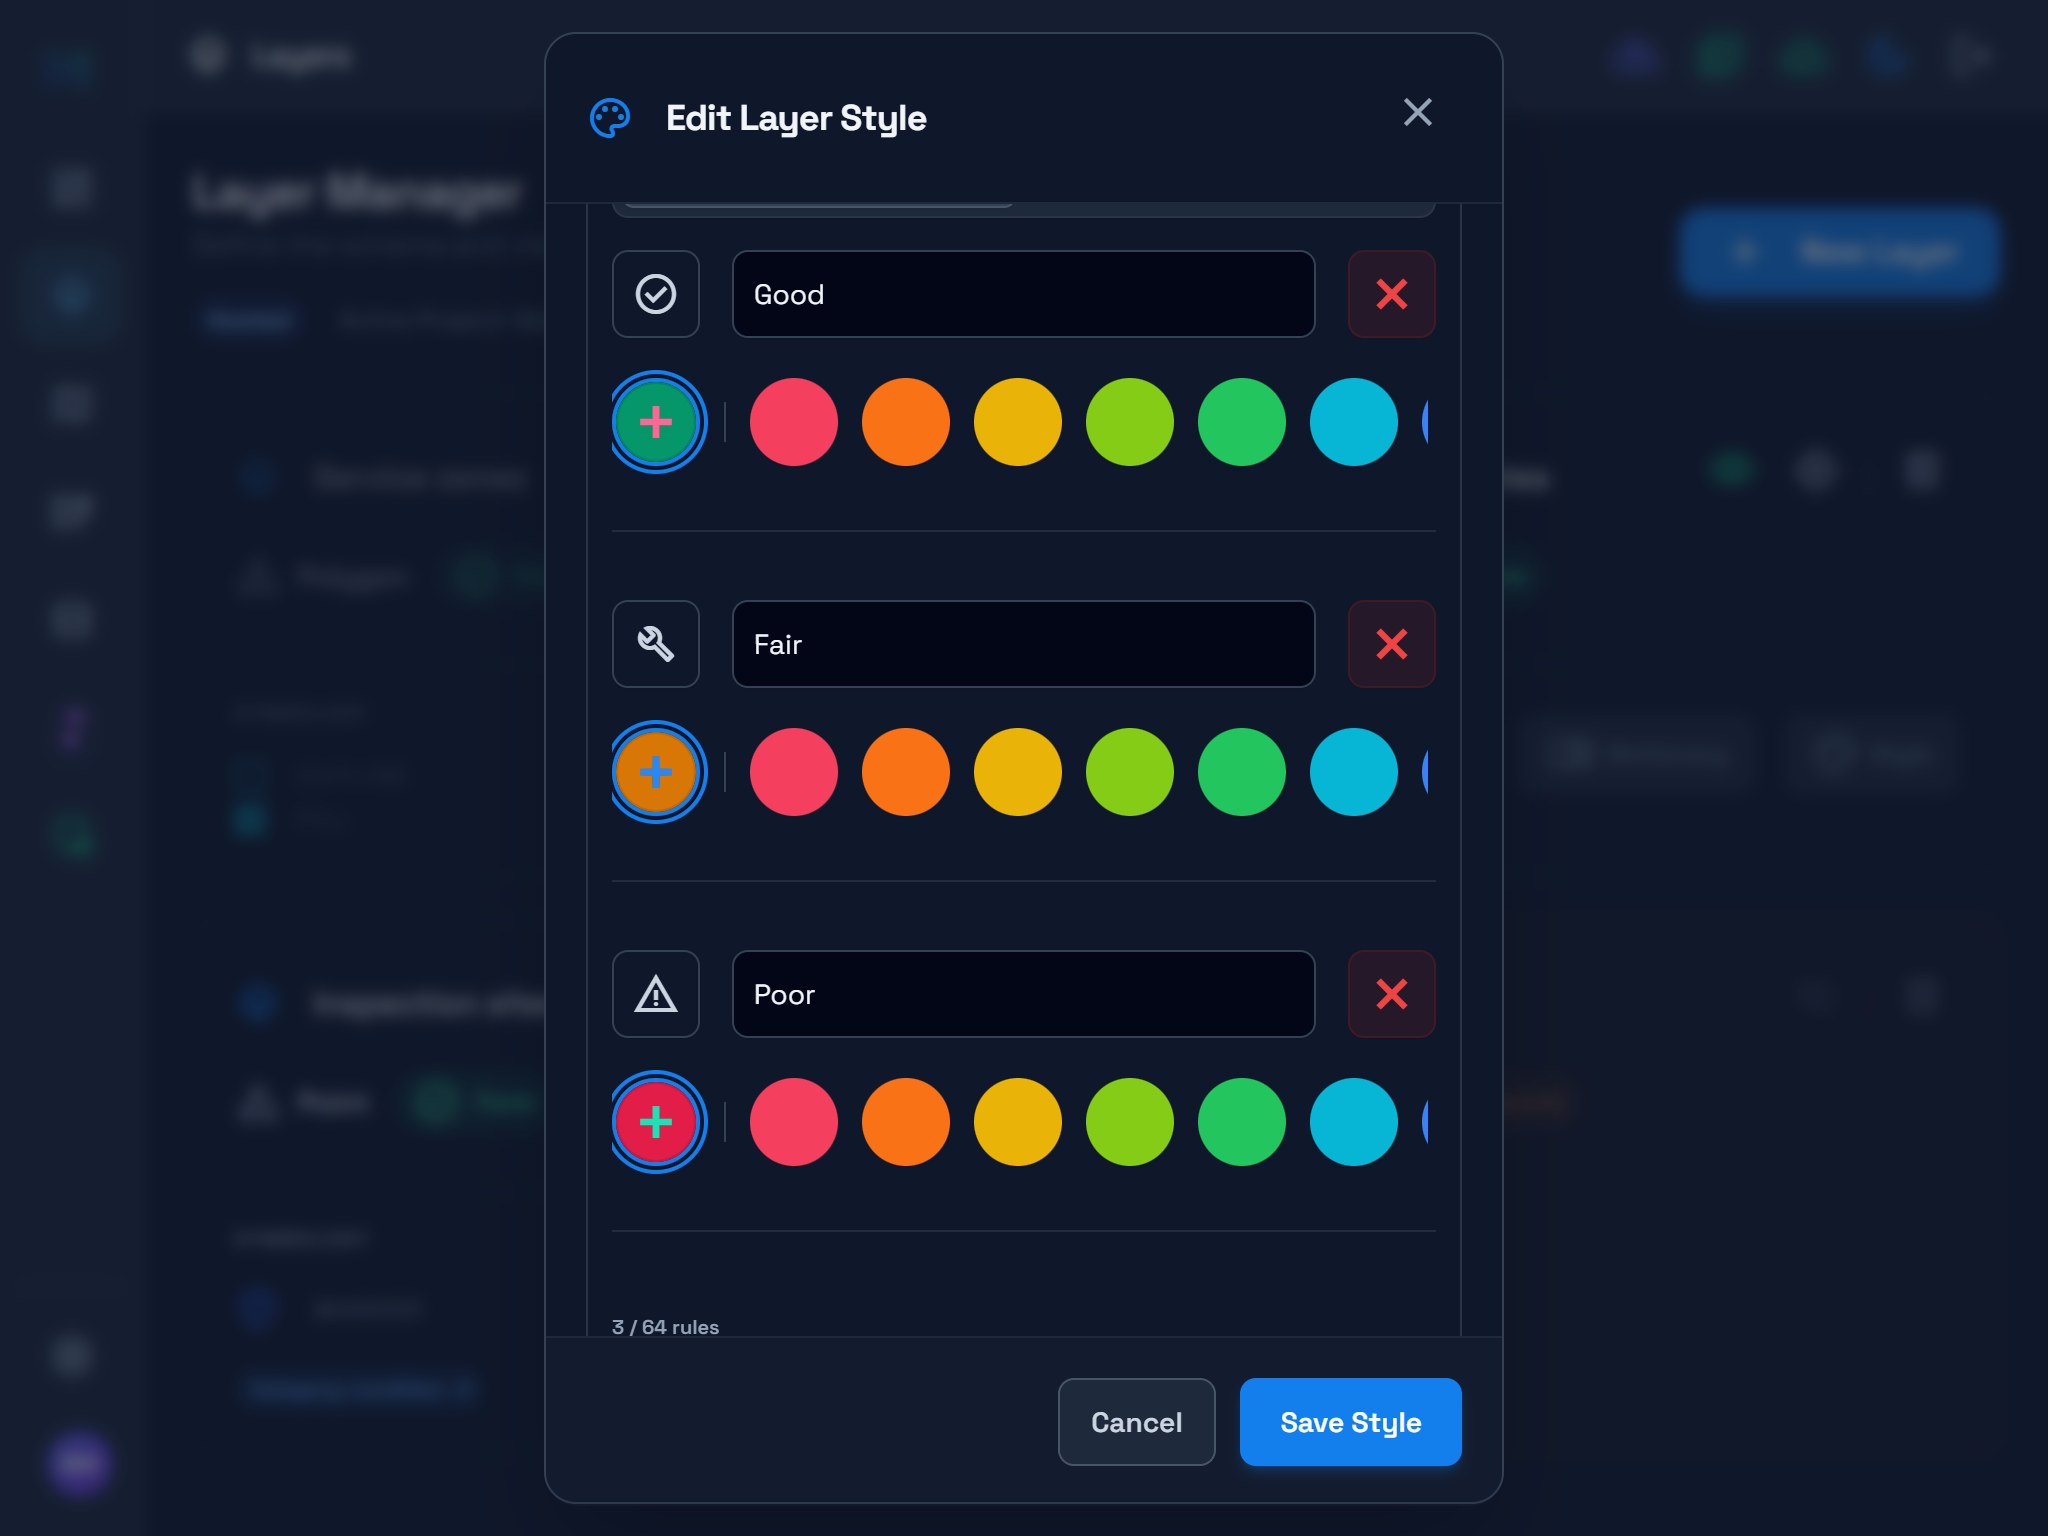
For example, a red symbol means Poor condition in this project. It is not automatically a failed upload or a required-field warning. See Layers & symbology for the other styling modes.
3. Put the form questions in a useful order
Open Forms and select Inspection sites. The configured fields begin with Asset ID, Condition, Height and Notes, followed by City, Service zone, Inspection date and optional Photo. This order lets a collector identify the site, assess it, and record supporting details before reviewing its location context.
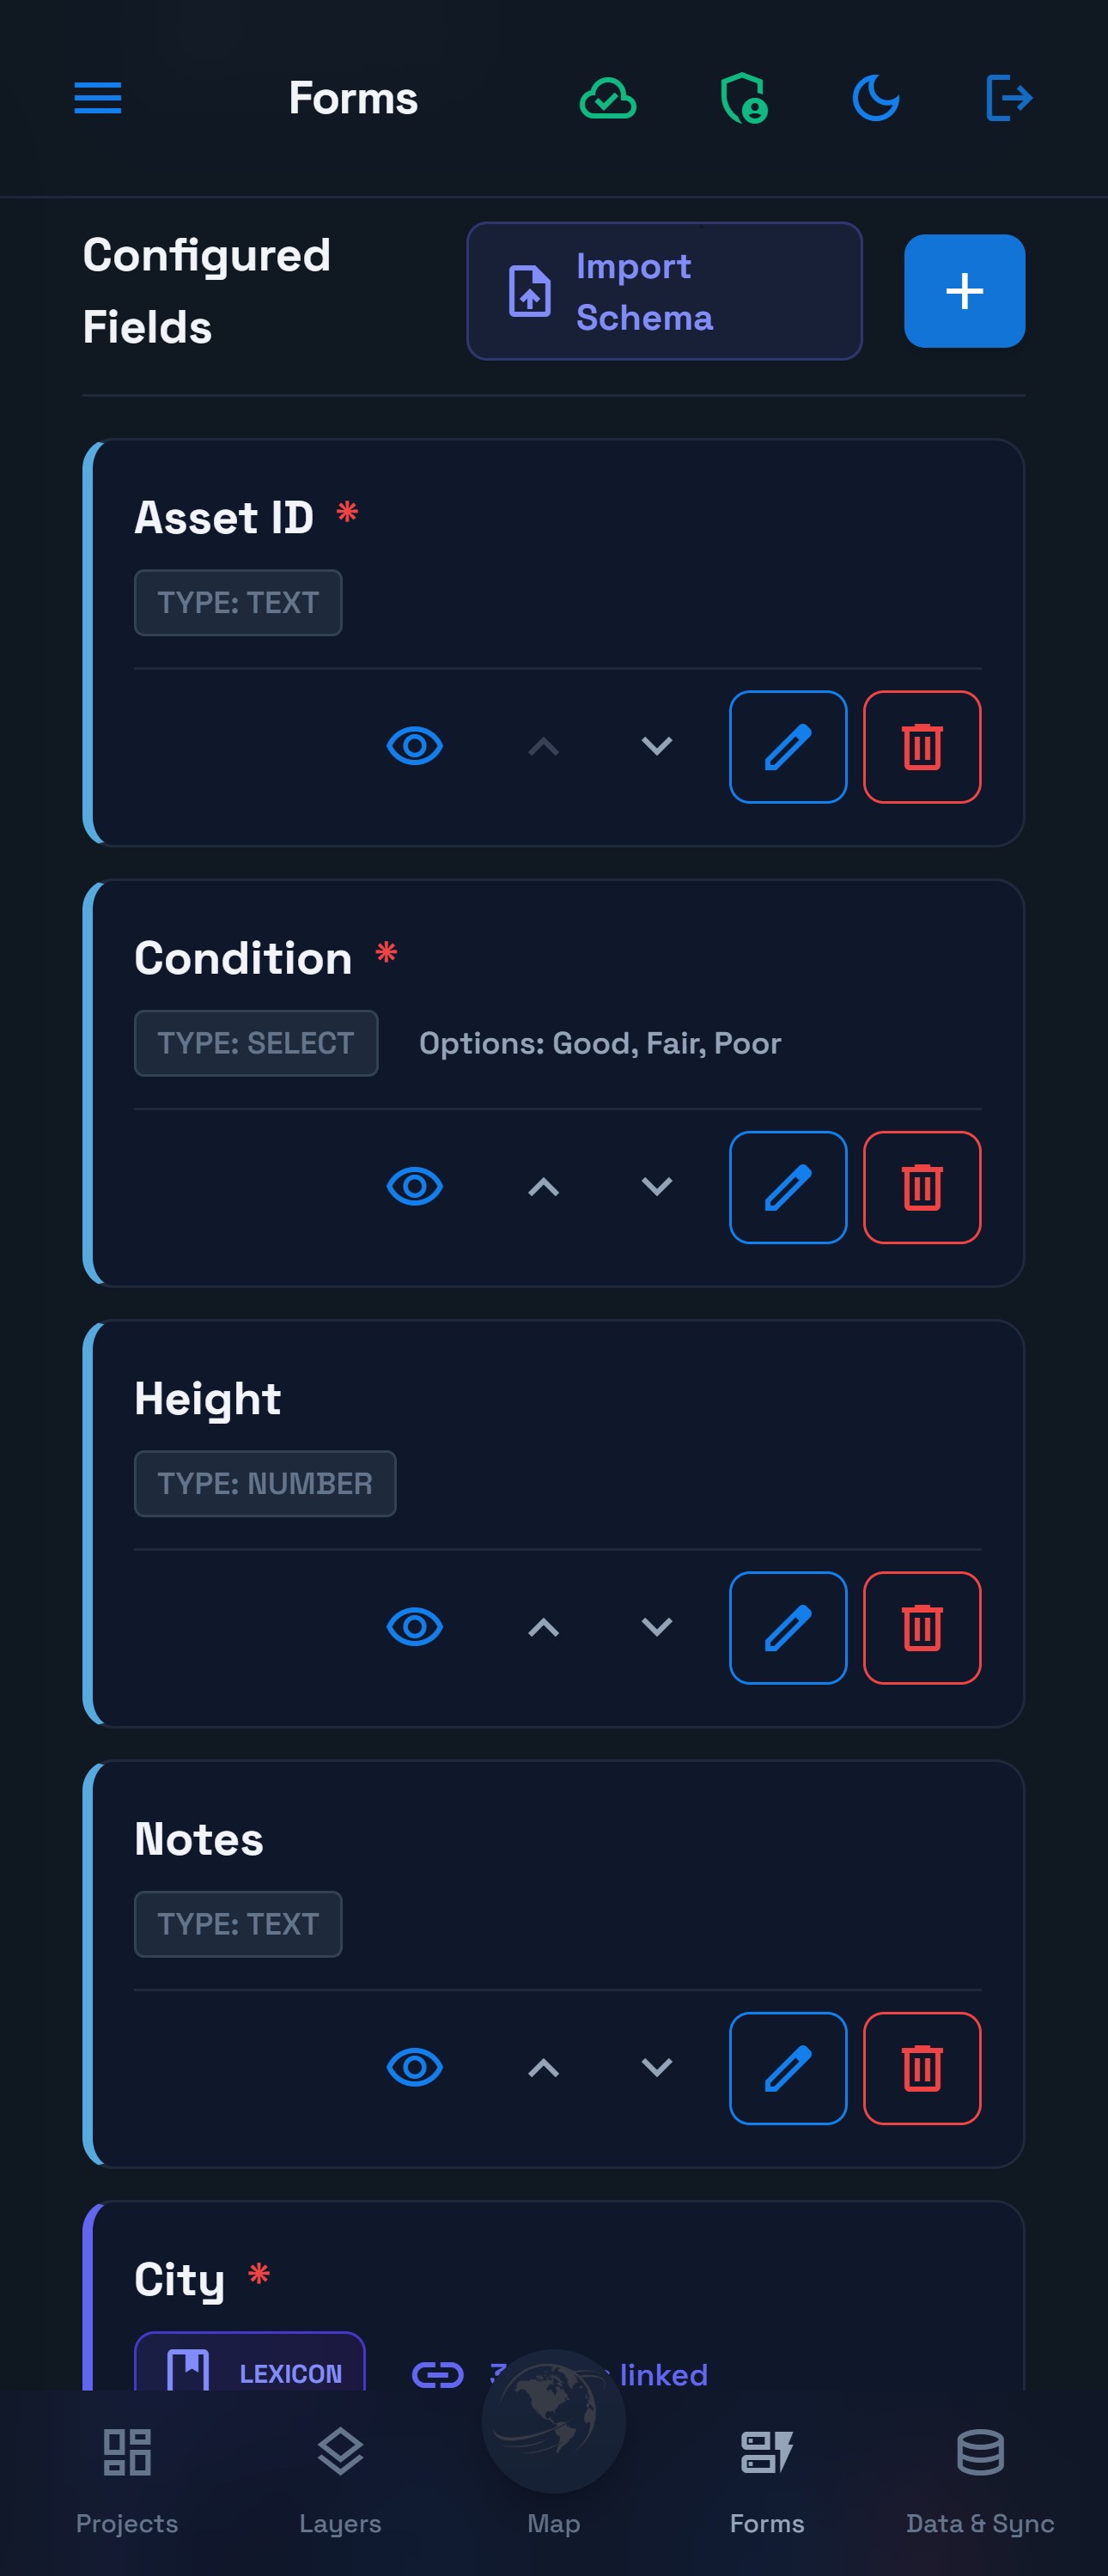
Open a field's Edit control to review its label, choices and required setting. The existing field type is locked. Renaming a label does not convert the stored values to another type or unit.
The form saves changes automatically. Saved on device confirms local persistence; Saved on device · Sync queued means delivery still needs to complete. Some unchanged forms display All changes saved. If the status says Save failed — tap to retry, select it and wait for the result. Fields saved · Rules incomplete means the unfinished rule has not replaced the last valid rules. For shared work, reopen the form and check synchronization before asking another collector to use the revised setup.
4. Reuse the approved city choices
A manual dropdown is suitable for one short list. Use a Lexicon when several fields should share the same approved choices. In the Mapplex Lexicon panel, open the existing Operating cities list and review New York, London and Tokyo. When building your own project and the list does not exist, use + / New, name it Operating cities, add each choice with Add Value, then choose Save Lexicon.
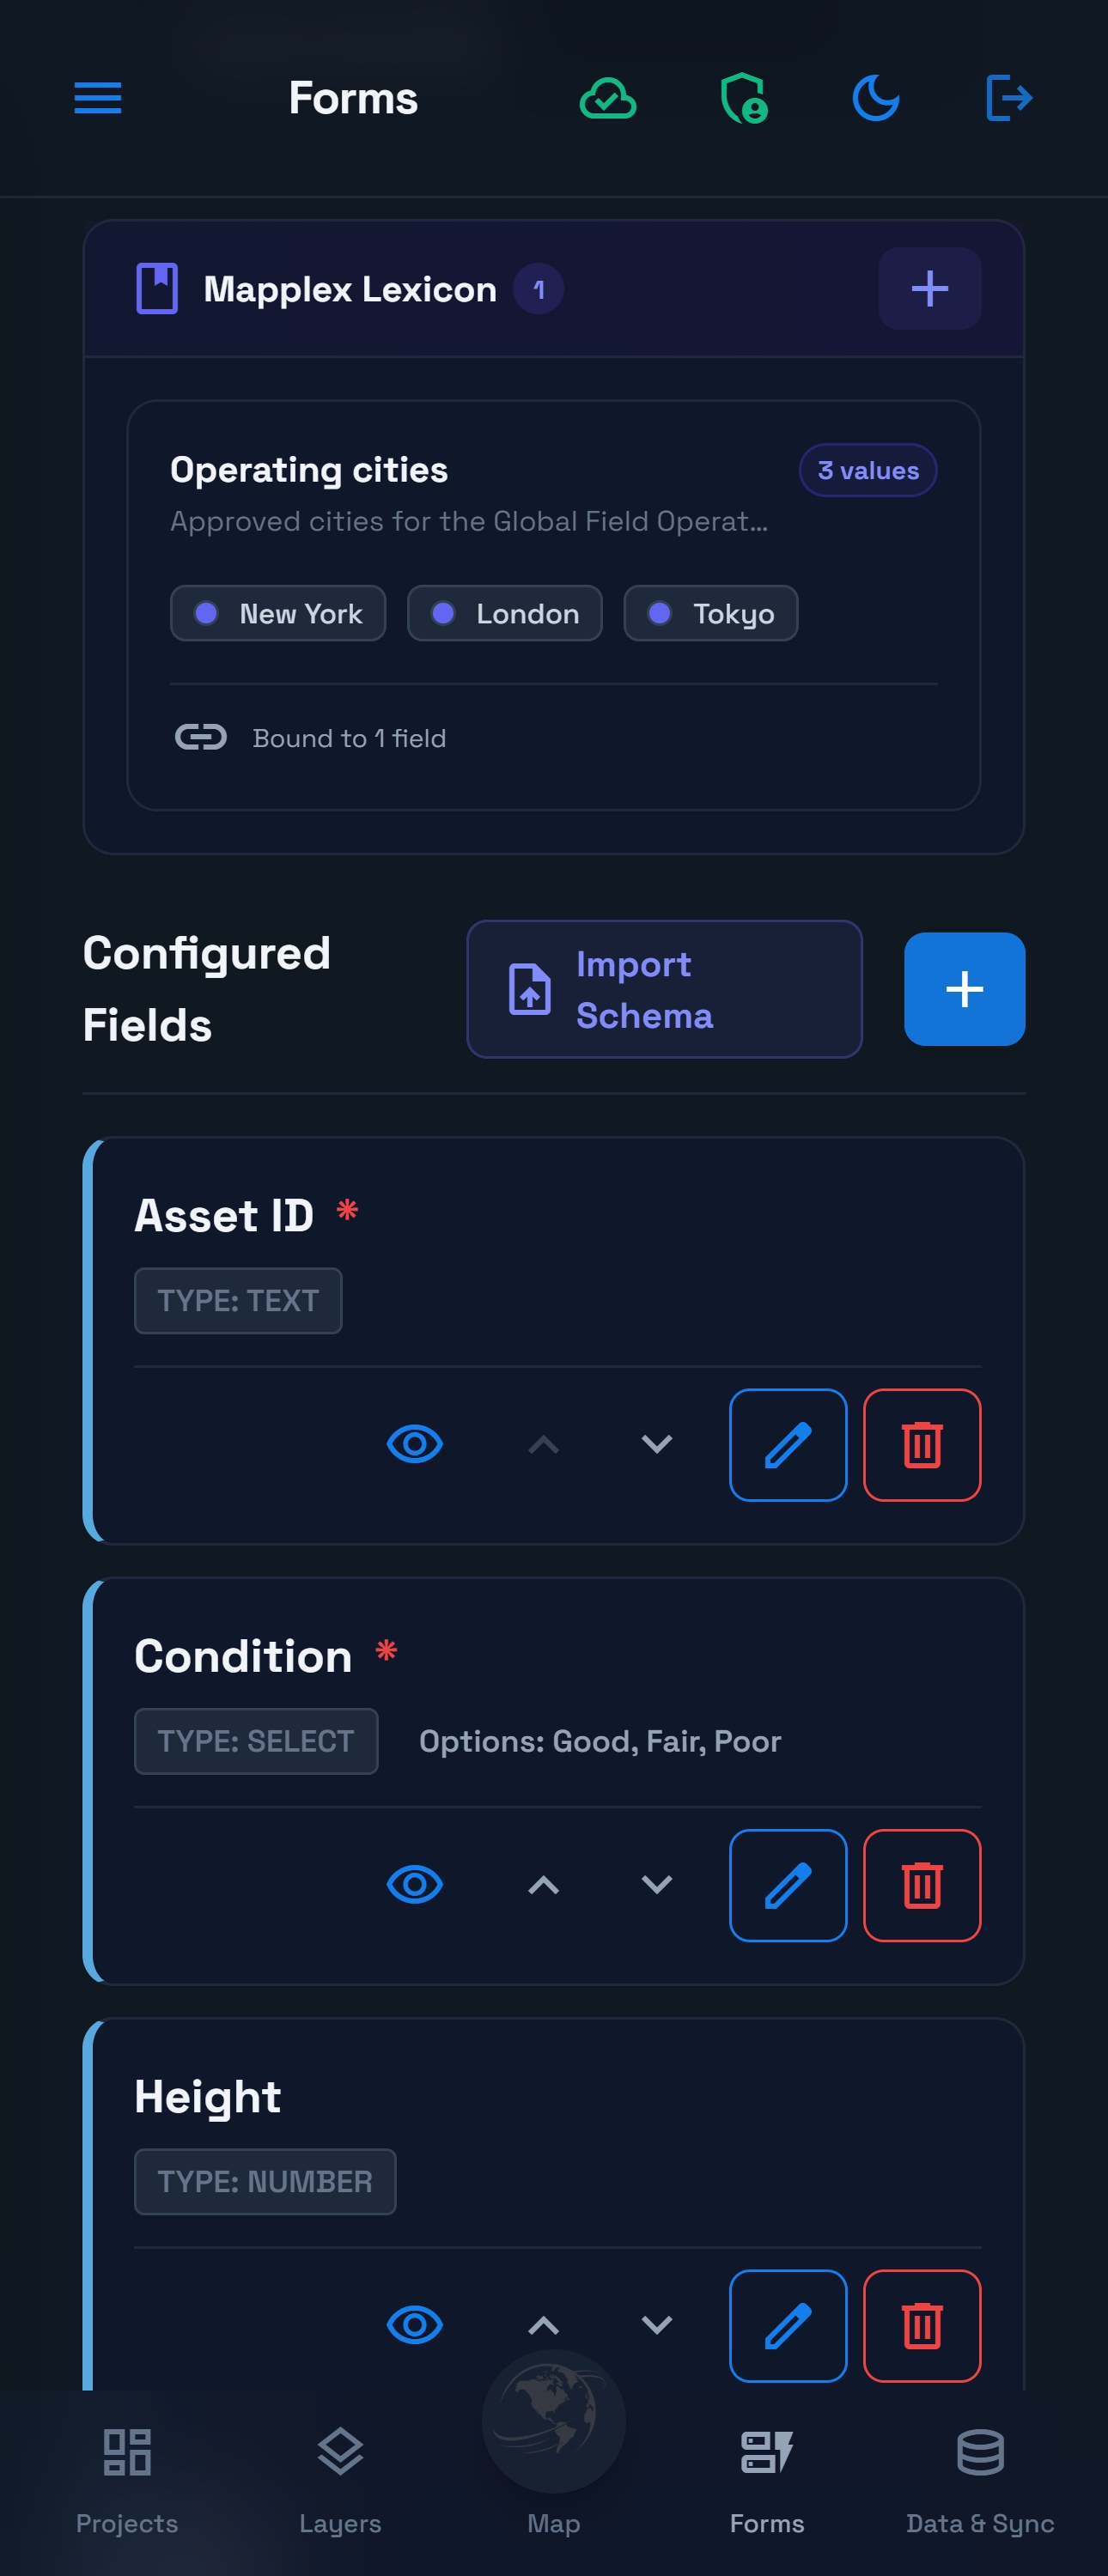
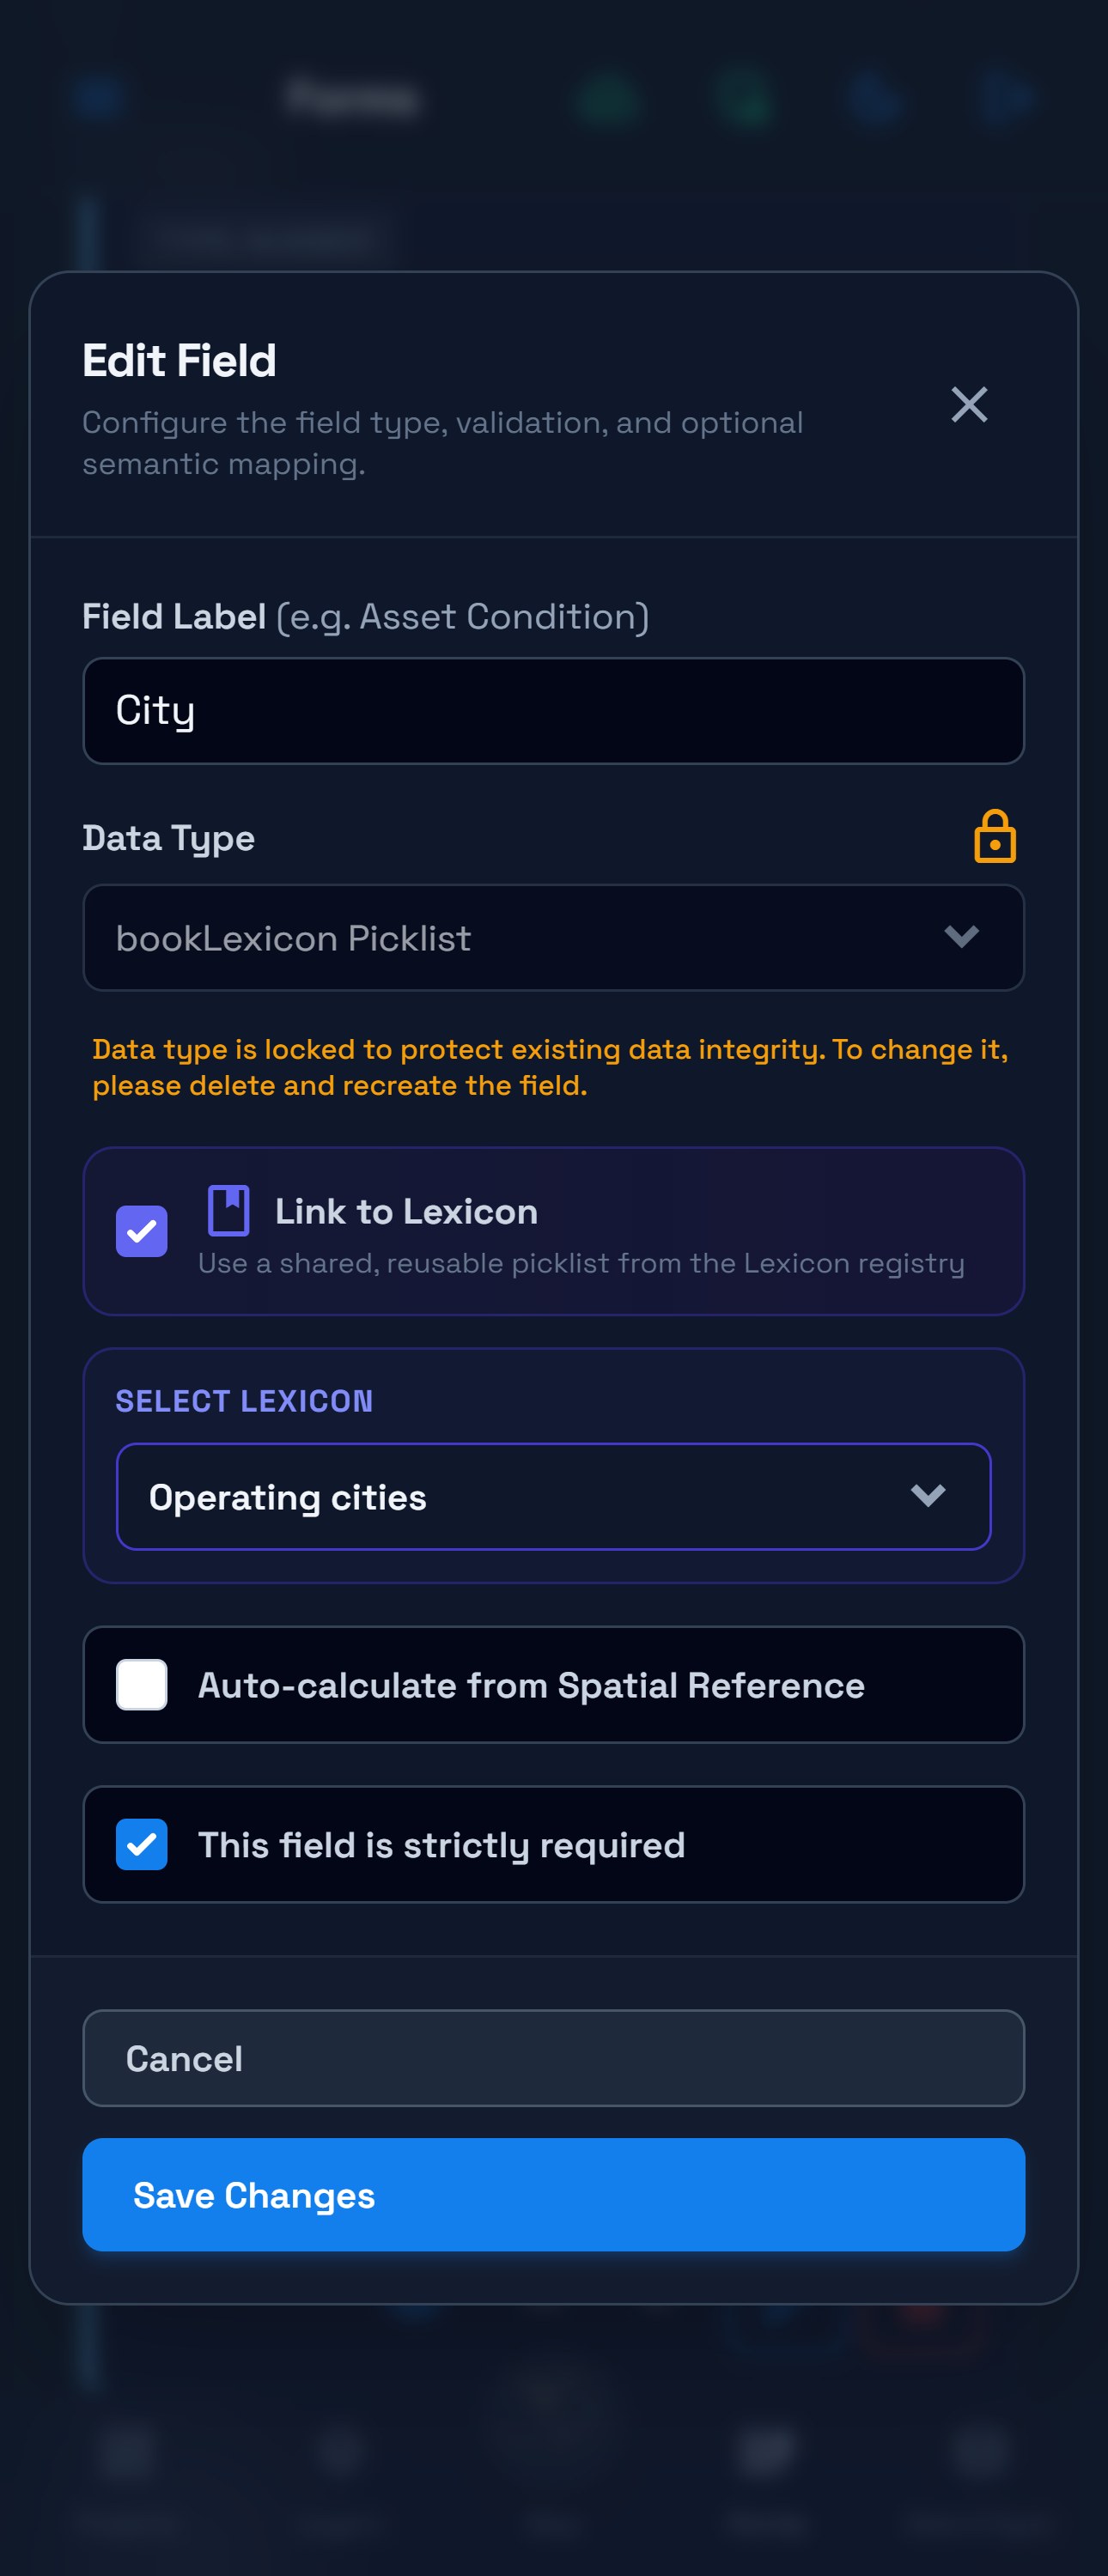
Edit City and check that Link to Lexicon is enabled with Operating cities selected. Review the three choices in the Lexicon panel above; the field editor confirms which list is linked. If you changed the binding in your own project, submit the field editor and wait for the save status; otherwise close it after reviewing. Existing fields open under Edit Field with a Save Changes button. Check the field label, then save only if you intended to change its configuration.
The Lexicon distinguishes a display label from a stored code. In this example, choosing New York in a new capture stores new_york. Existing inspection records retain their earlier New York value. Review this distinction when filtering or exporting mixed old and new records; linking the field is not a bulk conversion of existing data.
5. Require an explanation when condition is Poor
Scroll to Smart Logic. The prepared rule reads When Condition is Poor → require the Notes field. This makes the extra explanation part of the relevant inspection rather than requiring it for every record.
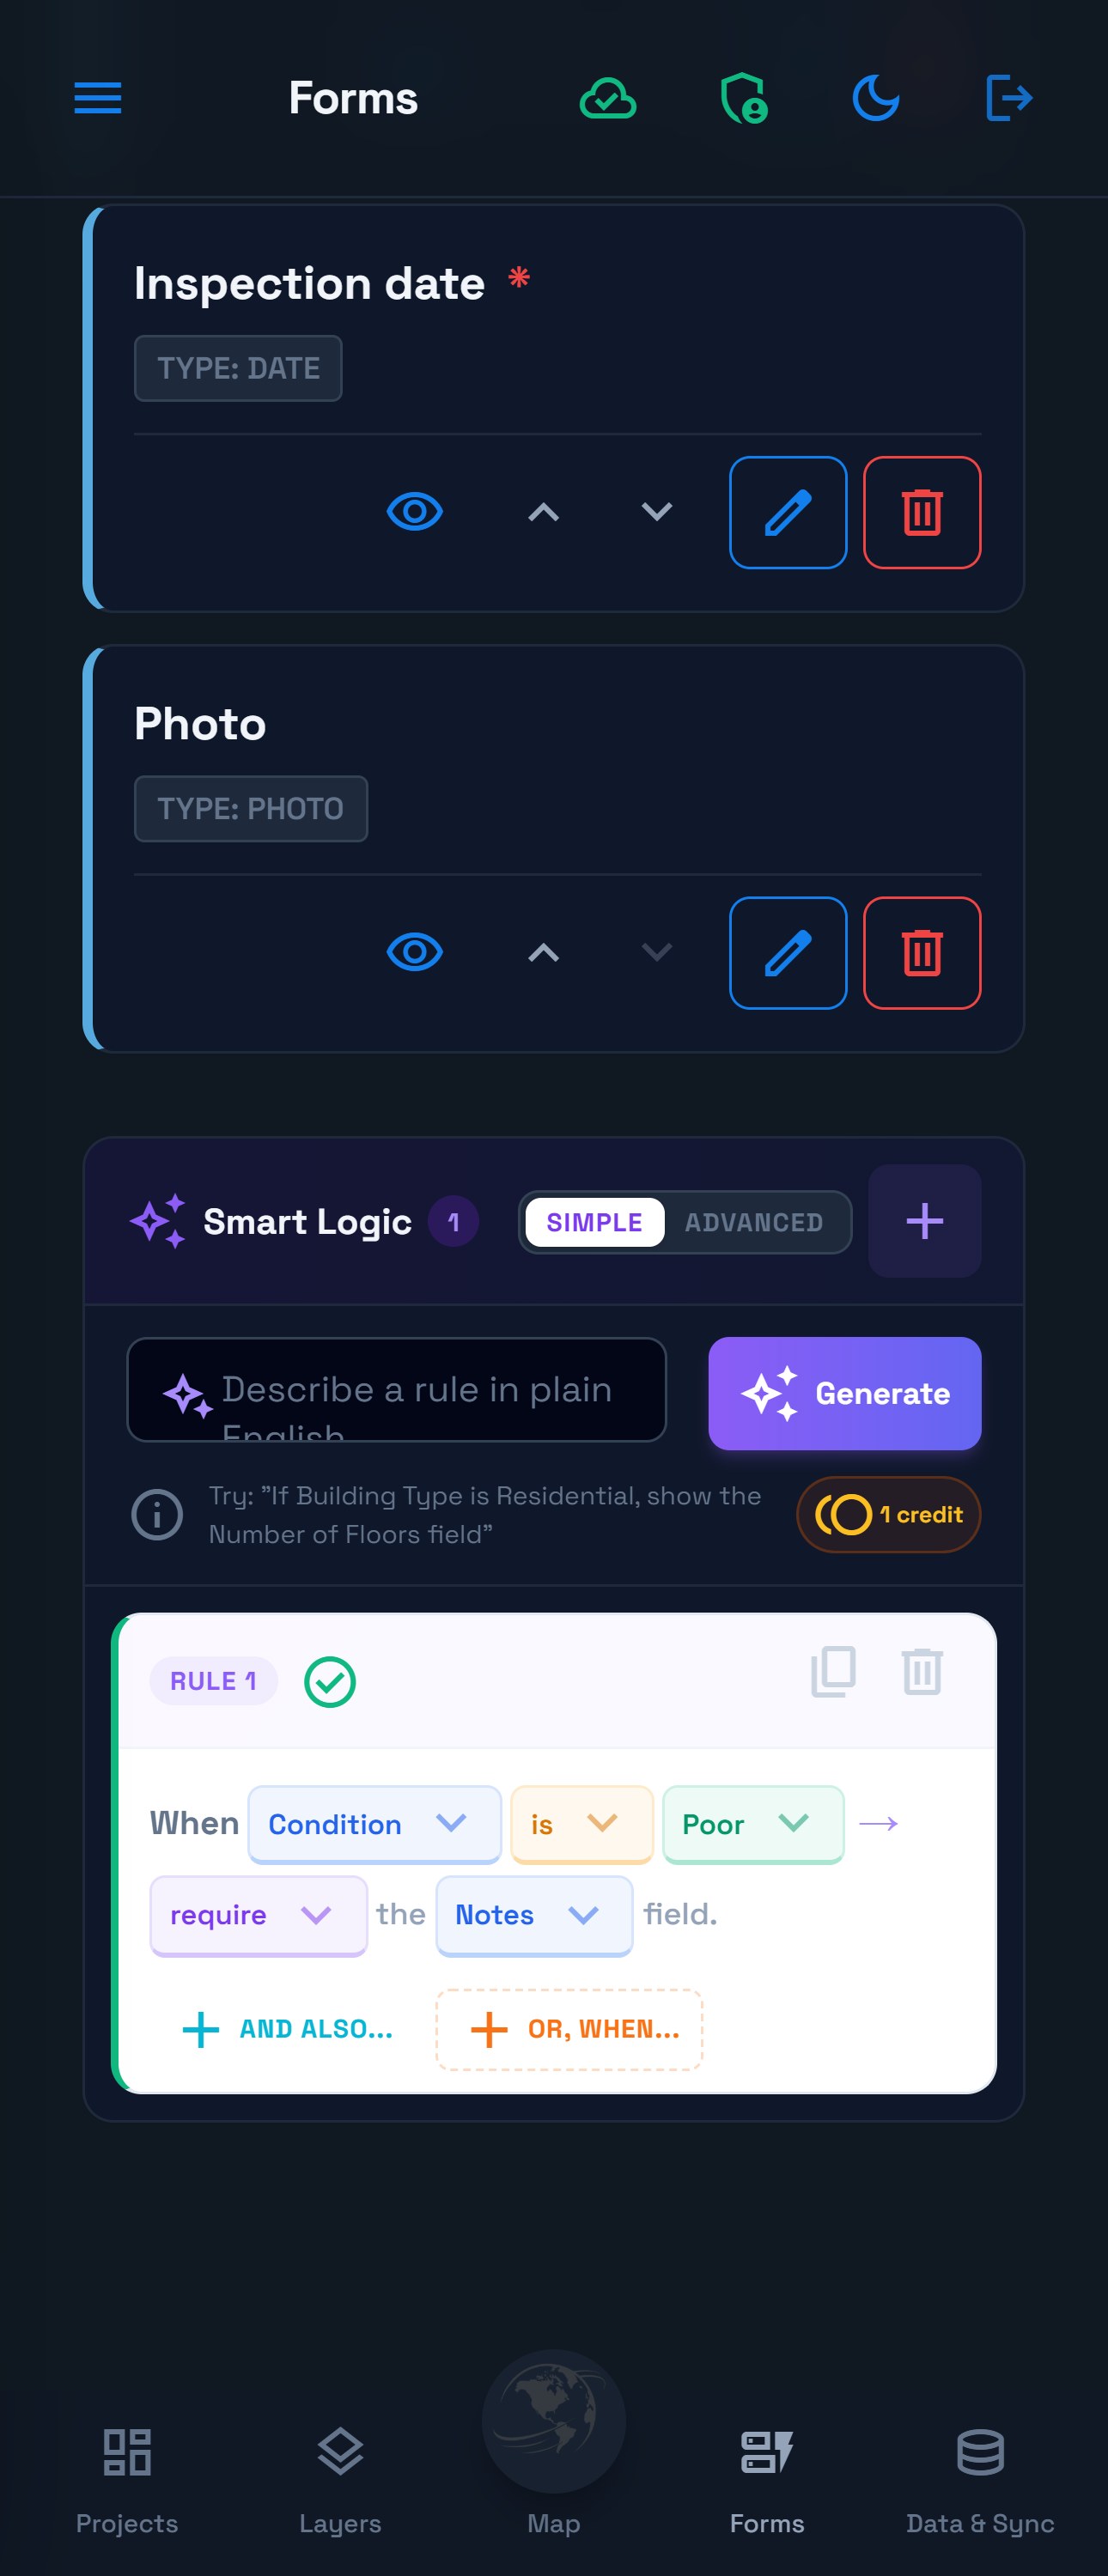
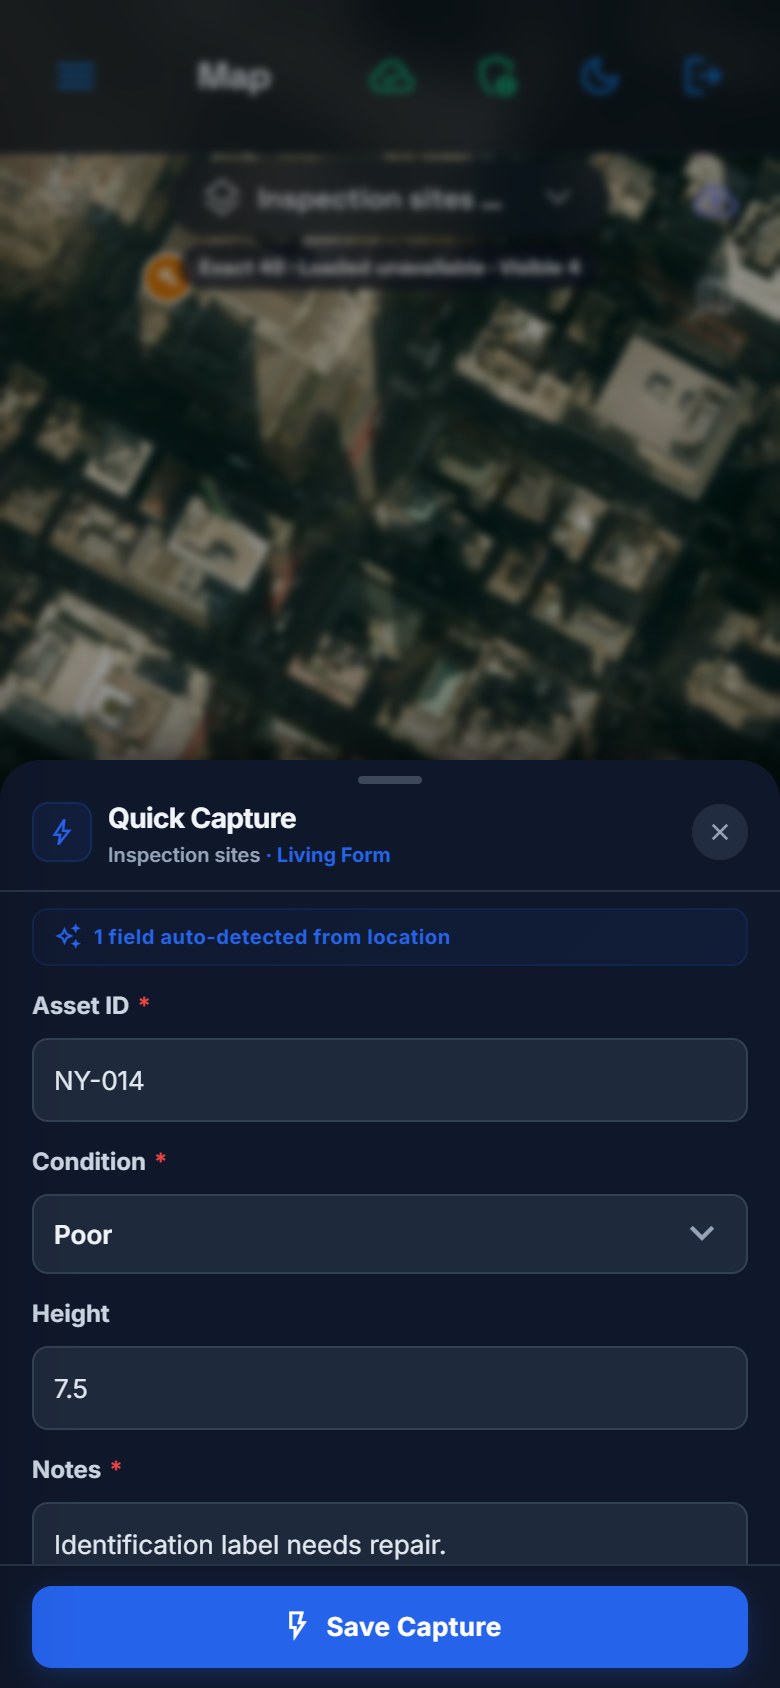
Test both paths in a practice capture: select Good and check that Notes is optional, then select Poor and check that it becomes required. Allow the form to finish updating before reviewing the result. Enter a useful note, such as Identification label needs repair. The rule does not write that explanation for the collector.
Both required-field states were checked in the actual Quick Capture form. See Forms & Smart Logic for conditions, actions and save-recovery behavior.
6. Fill the service zone from location
Edit Service zone and enable Auto-calculate from Spatial Reference. Select Service zones as the reference source and zone_name as the property to extract. The project contains separate reference records for this lookup, in addition to its visible service-zone feature layer.
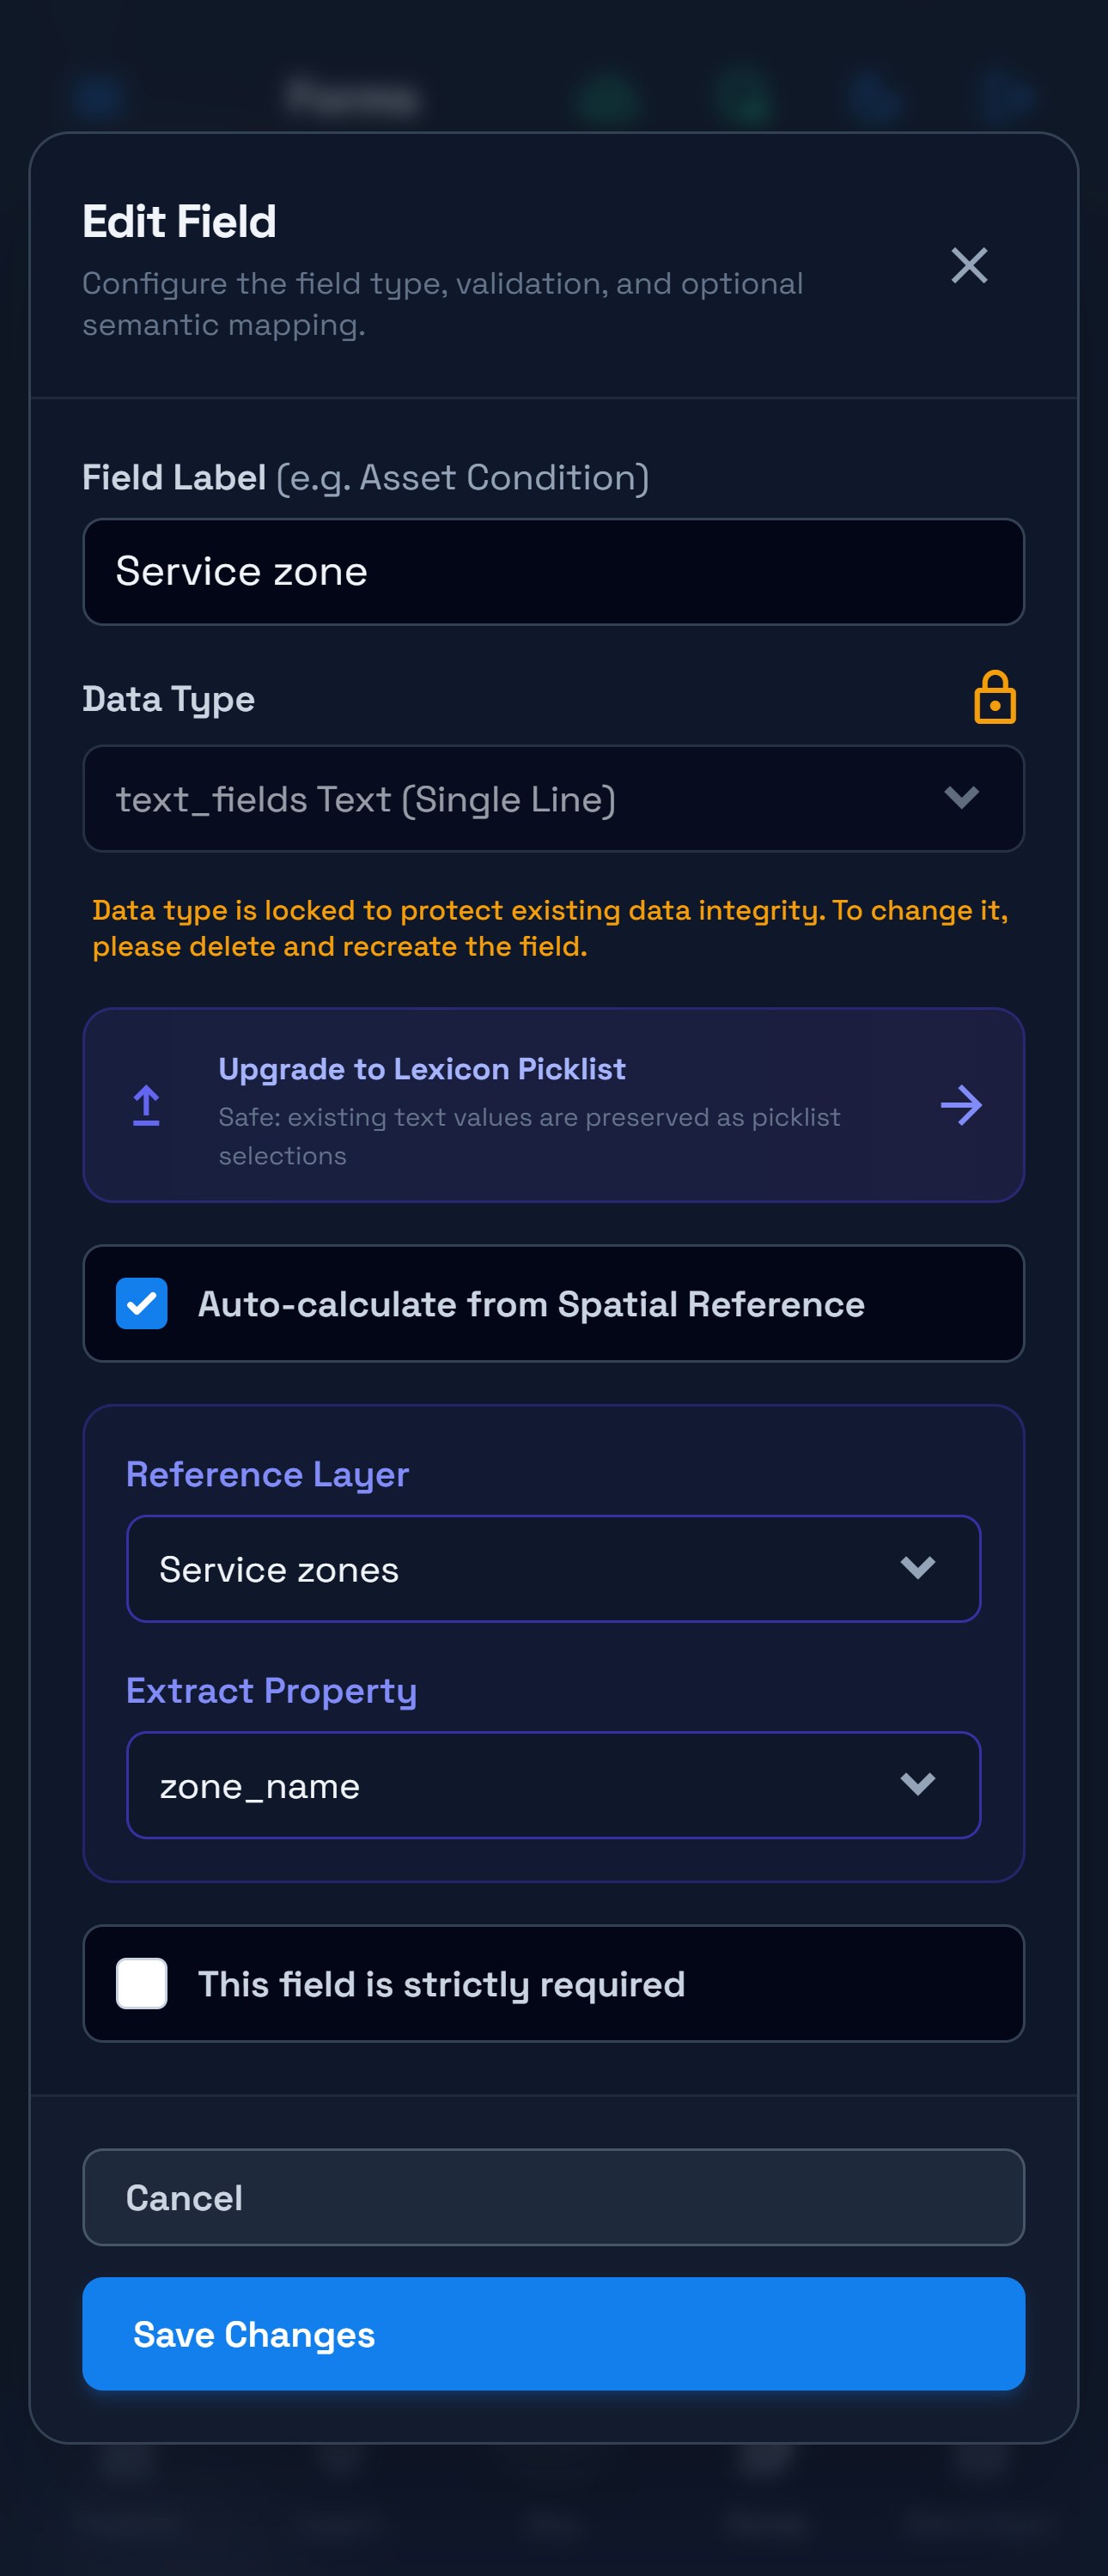
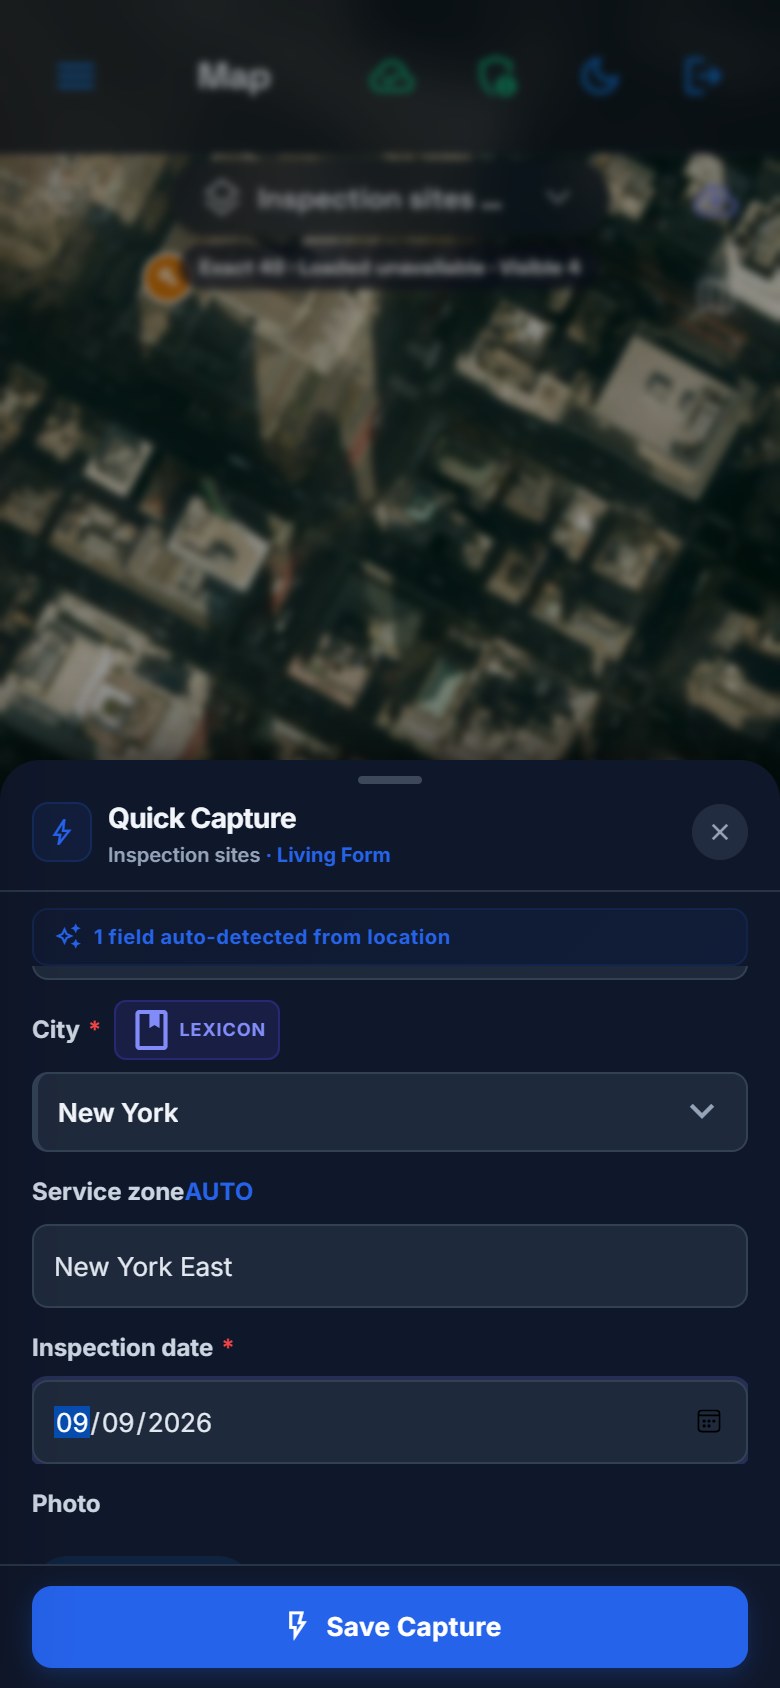
At the prepared coordinate 40.7509, -73.9815, the example fills New York East. Review the value before saving. This is a location lookup; it does not split the point, calculate an overlap percentage or certify a boundary. If a mapping needs attention, restore the source or enter the appropriate value manually as described in Spatial Auto-Fill.
7. Draw a route with contextual controls
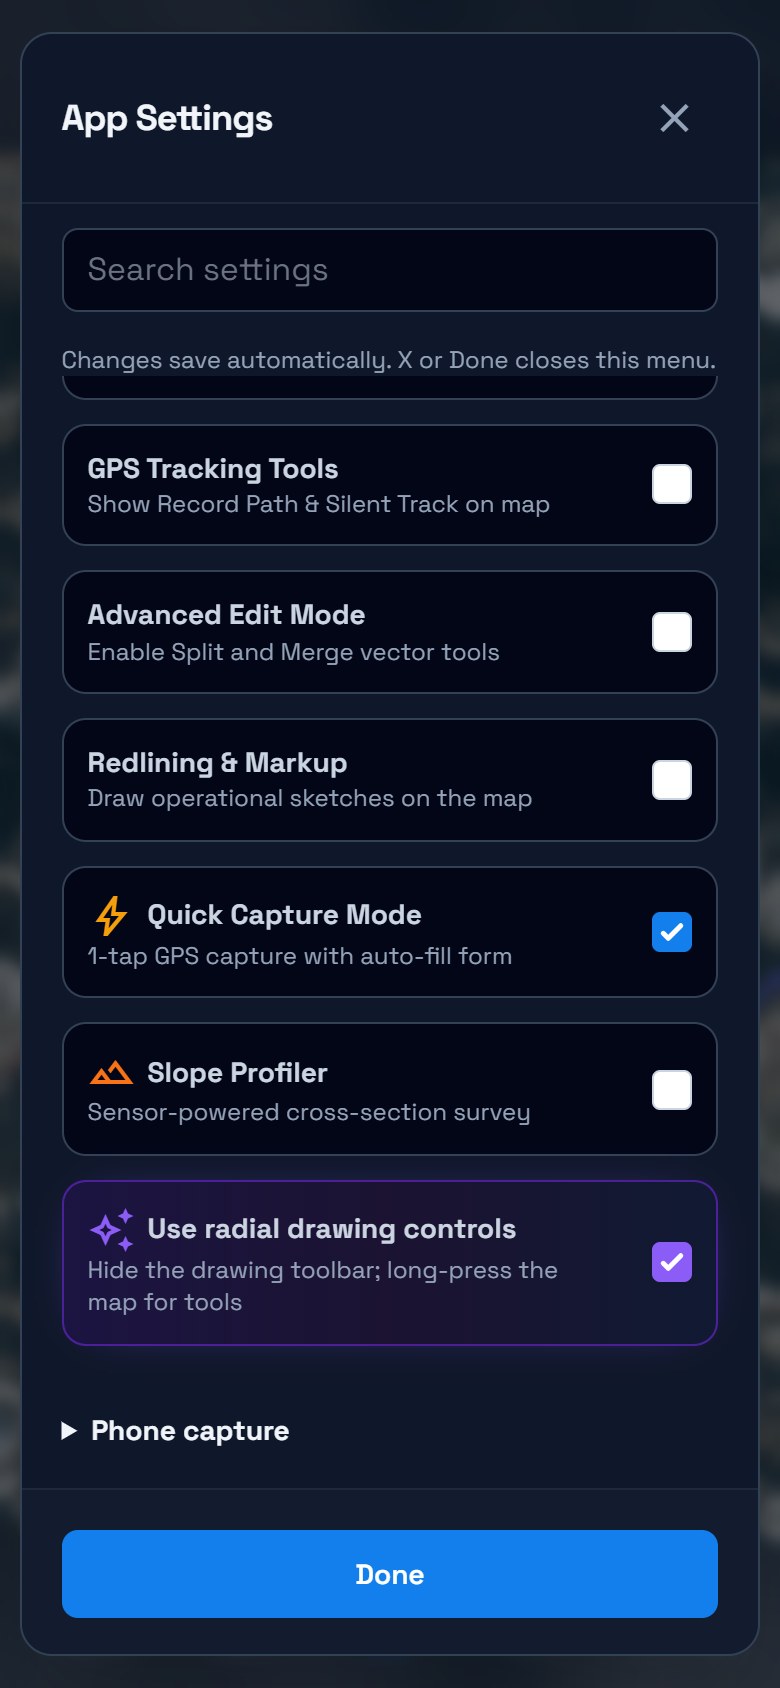
Select Maintenance routes on the map. In Settings → Field tools, keep Use radial drawing controls enabled. Long-press empty map space on a touch device, or right-click on desktop, then choose Draw. Opening the menu over an existing feature offers actions for that feature instead.
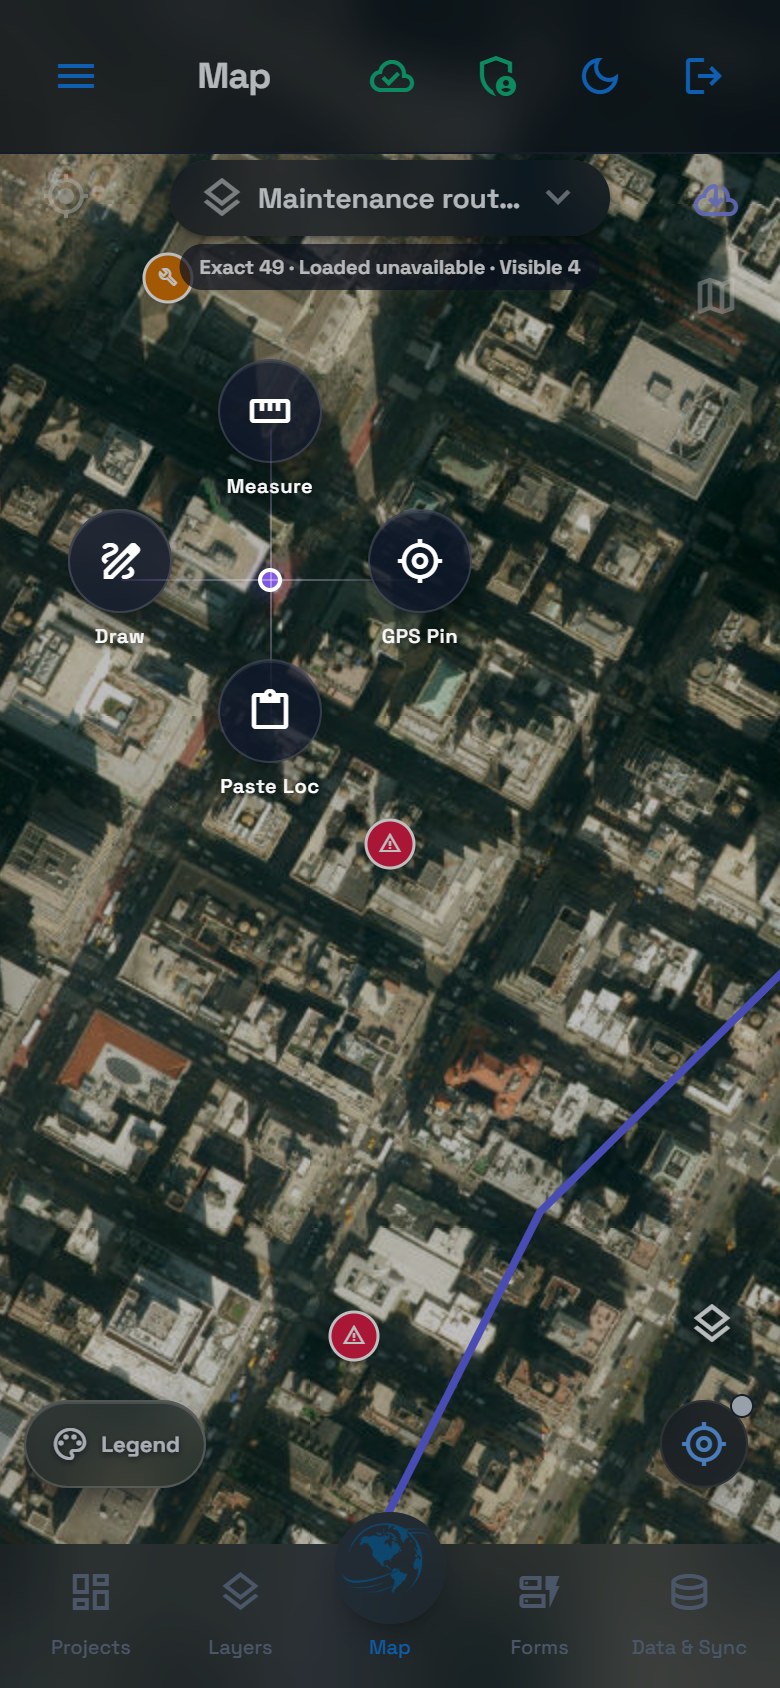
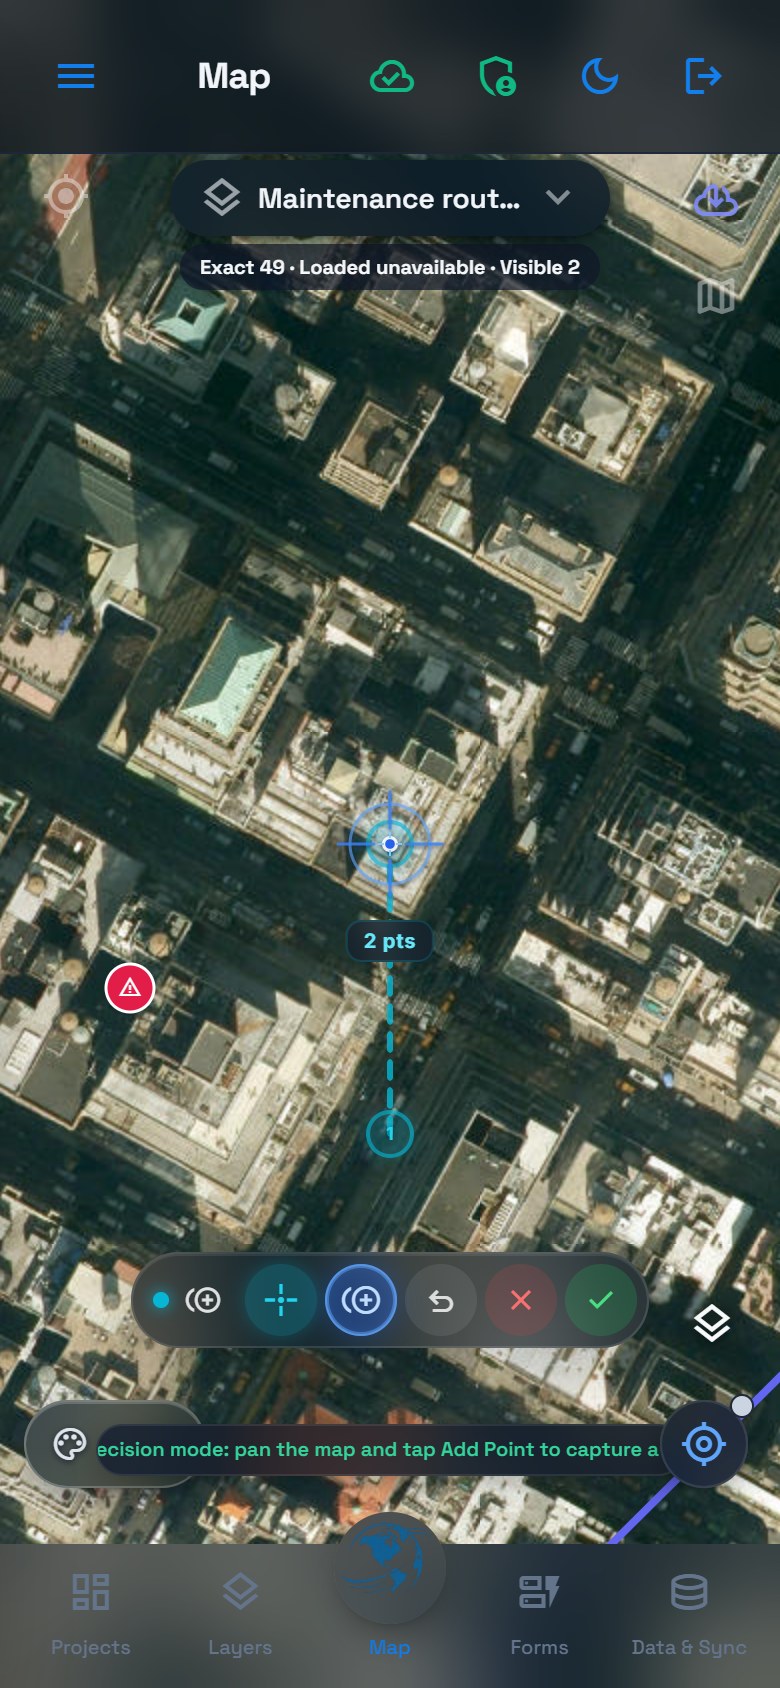
To use the Precision crosshair, select Add Point in the bottom action bar. If direct drawing is active, the first press enters Precision; a subsequent press captures the crosshair location. Pan the map under the crosshair, add the first vertex, then move to the next location and add the second.
See the tablet mode view
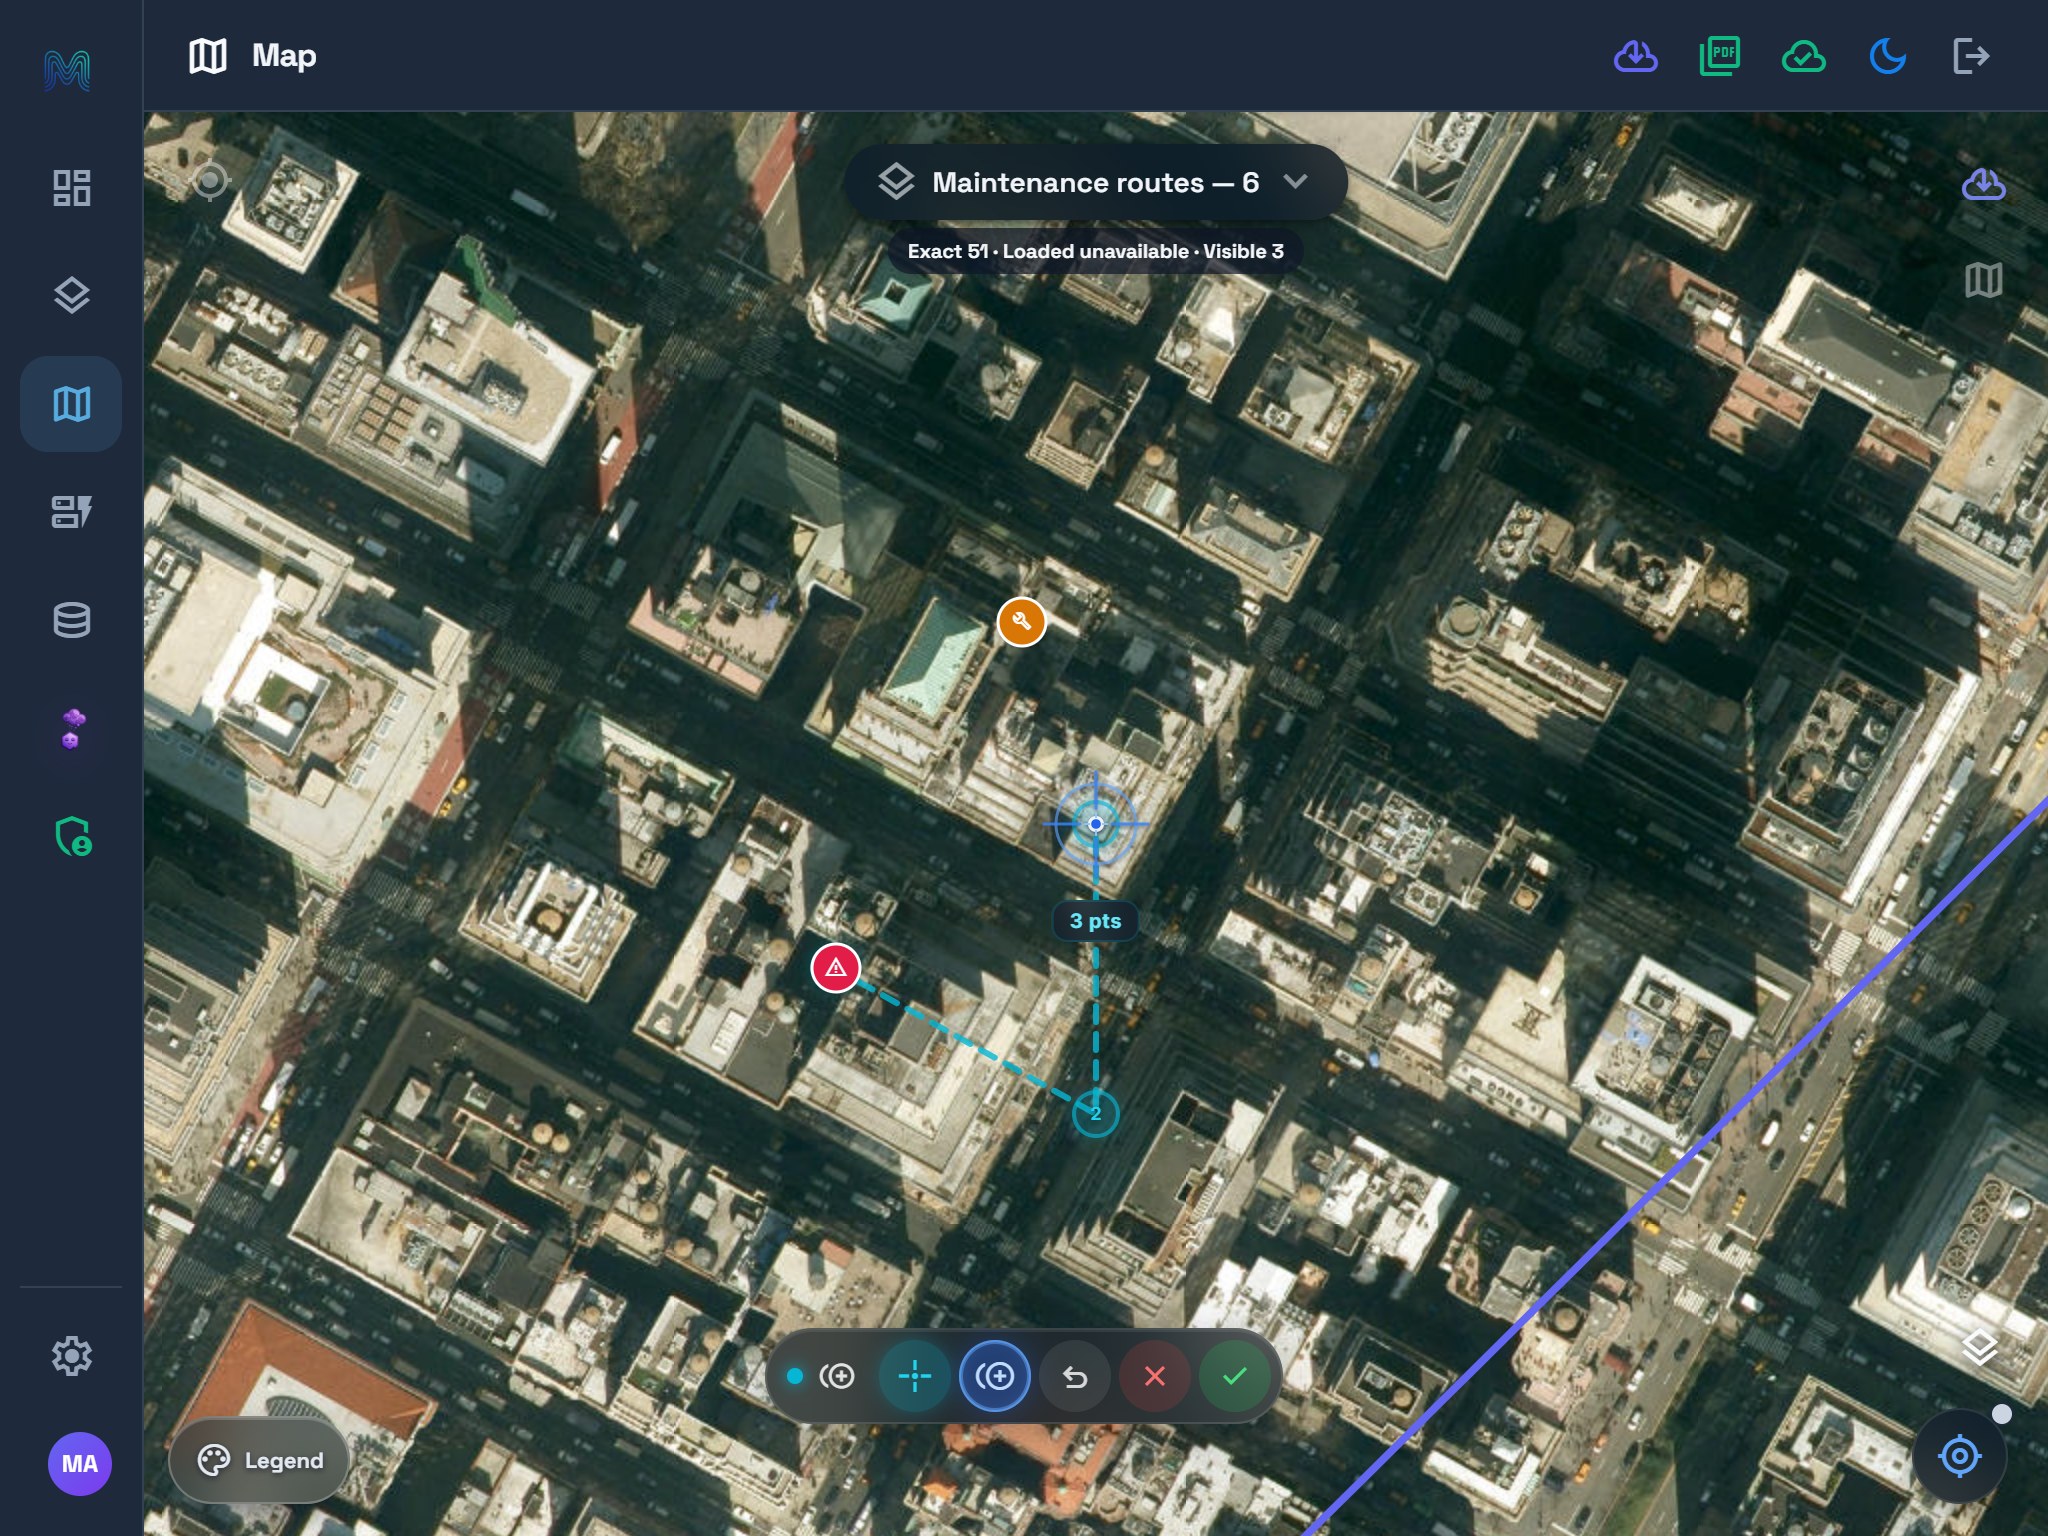
A line requires at least two vertices. Snap to Features helps place a vertex on available visible line or polygon geometry; review the snap target before adding it. Precision improves control over placement, not the accuracy of the imagery.
For this practice, choose Cancel to discard the crosshair draft. If the status still says Drawing, choose Cancel again to return to the idle map. This demonstration did not save a new route. Follow Contextual drawing for a complete draw, save and reopen workflow.
8. Test the complete Quick Capture form
Return to Inspection sites and enable Quick Capture Mode in Settings → Field tools. Keep the selected Point layer visible and check that the previous drawing task has ended.
For a repeatable practice, copy 40.7509, -73.9815, then use Paste Loc on empty map space. If clipboard access is unavailable, enter the same coordinate in the prompt. Review the temporary pin and choose Confirm Location. This is a prepared coordinate, not a GPS reading from a field visit. Enter NY-014, choose Poor, enter 7.5 for Height and add the label-repair note. Review City, Service zone and Inspection date before saving a real inspection.
See the tablet mode view
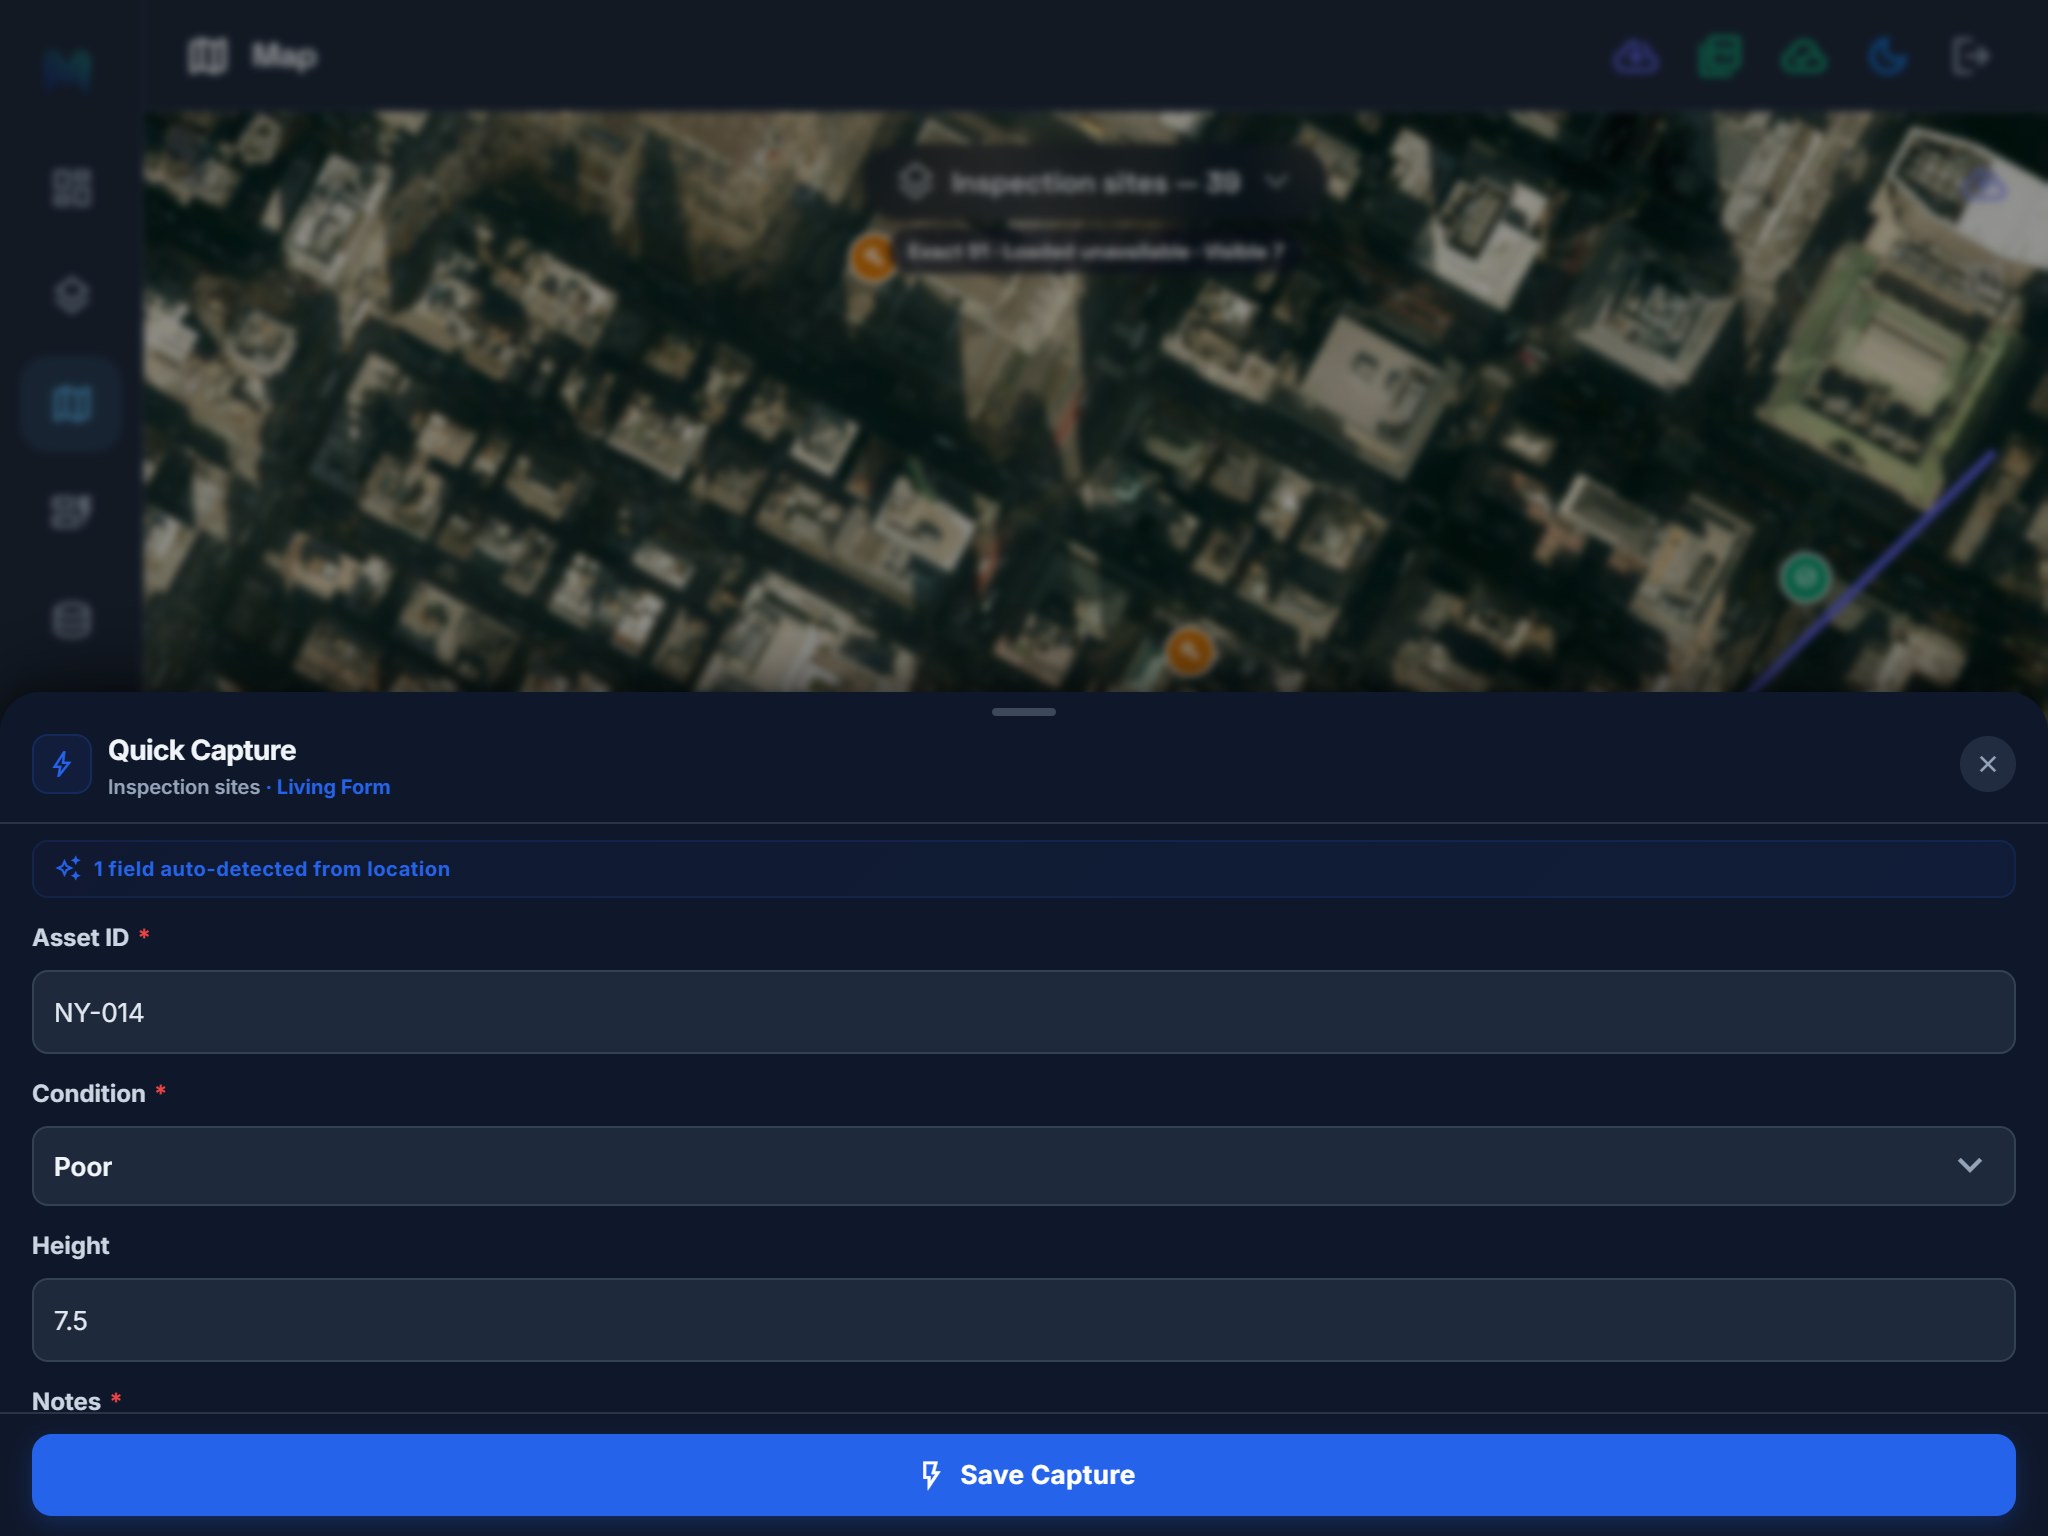
To finish this practice, choose the × (Dismiss) control at the top of Quick Capture. The sheet and temporary capture marker close without saving.
The original Part 2 NY-014 draft was closed without saving, leaving 37 inspection sites and 49 features overall at that step. The later tablet refresh also discarded its practice draft; current totals are explained in the sample-count timeline. For a real capture, choose Save Capture, reopen the record and confirm delivery as shown in the first walkthrough.
Follow the illustrated Geova AI review and voice readiness walkthrough to compare chat analysis with form voice entry.
Voice entry readiness
The Mapplex demo has an eligible plan, but voice access is not enabled for its workspace. These images therefore show typed entry. A successful native voice demonstration still needs workspace admission, permitted AI processing and field-data sharing, consent, connectivity, available points and an Android microphone check. See Fill a Quick Capture form by voice for the code-based workflow, supported fields, review and fallback steps.
Download the Part 2 form and Lexicon reference. The files document this example; they are not a one-click project installer.
Before you continue
The route and NY-014 practice drafts are discarded. No records were added: this stage remains 37 sites / 49 features. Keep Quick Capture enabled for the offline-save lesson.
Previous: Part 1 · Global field walkthrough · Learning path & counts · Next: Part 3 · Review, sync and deliver